Control a Physical iPhone from macOS with Appium
Date: 2026-06-25
Status: Verified locally
System: macOS, Xcode, Appium, XCUITest, WebDriverAgent, physical iPhone, Mobile Safari
Sensitive data: Masked
Last verified: 2026-06-26
Goal
Set up a Mac and a physical iPhone so Appium can control the iPhone over USB for repeatable automation work.
The working end state is:
- The iPhone appears in Xcode as a trusted physical device.
- Xcode has an Apple account, personal team, and Apple Development certificate.
- WebDriverAgentRunner installs and runs on the iPhone.
- Appium can take screenshots, read UI source, tap, swipe, type, open apps, and close sessions.
- Appium can test websites in Mobile Safari by switching into the
com.apple.mobilesafariweb context.
This guide assumes the engineer is using a Mac and iPhone for the first time.
Before You Start
Plan for 60-90 minutes for the first successful setup. Most of that time is Xcode installation, account signing, and resolving first-run iPhone prompts. Later reconnects should take only a few minutes.
You need:
- A Mac with administrator access and a stable internet connection.
- Xcode installed from the Mac App Store.
- An Apple ID that can be added to Xcode. A free personal team is enough for local testing.
- A physical iPhone, USB cable, and the phone passcode.
- Developer Mode enabled on the iPhone.
- Safari
Web Inspectorenabled on the iPhone if you plan to test websites in Mobile Safari. - The iPhone kept unlocked during setup and first verification.
- Terminal access for Homebrew, Node.js, Appium, and diagnostic commands.
Do not begin Appium session debugging until Xcode can see the iPhone and WebDriverAgent signing is clean. Appium cannot work around an untrusted phone, missing Developer Mode, or broken signing.
Setup Map
Follow the setup in this order:
- Install Xcode and command line tools.
- Install Homebrew, Node.js, Appium, and iOS diagnostic tools.
- Add an Apple account and create an Apple Development certificate in Xcode.
- Connect the iPhone, trust the Mac, enable Developer Mode, and enable UI Automation.
- Enable Safari Web Inspector if you will test websites in Mobile Safari.
- Configure and sign WebDriverAgentRunner.
- Start Appium on localhost.
- Create a real-device session.
- Verify screenshot, UI source, tap, Home, app launch, Safari web context, and clean session deletion.
- Run the reconnect checklist after unplug, restart, or long idle periods.
Treat each phase as a gate. If a phase fails, fix that phase before moving forward.
What This Setup Does
- Appium runs an HTTP automation server on the Mac.
- The XCUITest driver builds and installs WebDriverAgent on the iPhone.
- WebDriverAgent uses Apple's XCTest APIs to interact with the phone.
- WebDriverAgent can also expose a live MJPEG screen stream on the Mac for faster visual inspection than repeated Appium screenshots.
- The phone remains a normal non-jailbroken iPhone.
- The USB cable stays connected during the setup and the first reliability test.
Concepts
- Xcode: Apple's IDE and build toolchain. Physical iPhone automation depends on Xcode because WebDriverAgent is an iOS test runner that must be built and signed.
- Xcode Command Line Tools: Terminal tools such as
xcodebuild,xcrun, andxctrace. Appium uses these tools behind the scenes. - Apple account: The account added inside Xcode. A free personal team is enough for local physical-device testing.
- Team ID: Apple's identifier for the development team. Appium uses it through
appium:xcodeOrgId. - Certificate: A signing identity stored in the Mac keychain. For this setup, use an
Apple Developmentcertificate. - Private key: The secret key paired with the certificate. It stays on the Mac and should not be copied into documentation or scripts.
- Bundle identifier: A reverse-DNS app identifier, for example
com.example.WebDriverAgentRunner. - Provisioning profile: Apple's signed permission file that connects a team, certificate, app identifier, and allowed device.
- Entitlement: A signed app permission. Xcode embeds entitlements into the signed app when needed.
- Developer profile on iPhone: The iPhone-side trust entry created when a development-signed app is installed.
- Developer Mode: iOS setting required on iOS 16 and later before development-signed apps can run reliably.
- Safari Web Inspector: iPhone Safari setting that allows the Mac-side Web Inspector protocol to see Safari tabs. Appium needs it for Mobile Safari web-context testing.
- WebDriverAgent: The XCTest server app that Appium installs on the phone.
- MJPEG stream: A live sequence of JPEG screen frames served by WebDriverAgent. It is useful for watching fast-changing screens while Appium commands still run through the normal Appium session.
- UDID: The unique device identifier. Treat it as sensitive and mask it in public docs.
Known Verified Versions
The screenshots and commands in this guide were verified with this stack:
| Component | Verified value |
|---|---|
| macOS | Mac with Xcode installed |
| Xcode | 26.0.1 |
| iPhone | iPhone 8 |
| iOS | 16.7.12 |
| Node.js | 24.x |
| npm | 11.x |
| Appium | 3.5.2 |
| Appium XCUITest driver | 11.14.x |
| Connection | USB |
Exact versions can differ. The important part is that Xcode detects the phone, Appium has the xcuitest driver installed, and WebDriverAgent can be signed for the same iPhone.
Final Configuration
- Mac: macOS with Xcode installed.
- Package manager: Homebrew.
- Node.js: installed through Homebrew or another trusted package manager.
- Appium: installed globally with
npm. - Appium driver:
xcuitest. - iPhone: trusted over USB, Developer Mode enabled, UI Automation enabled.
- Mobile Safari web testing: Safari Web Inspector enabled.
- WDA bundle ID: use your own unique value, for example
com.example.WebDriverAgentRunner.
Mac Setup
1. Install Xcode
Open the Mac App Store, search for Xcode, and install it.
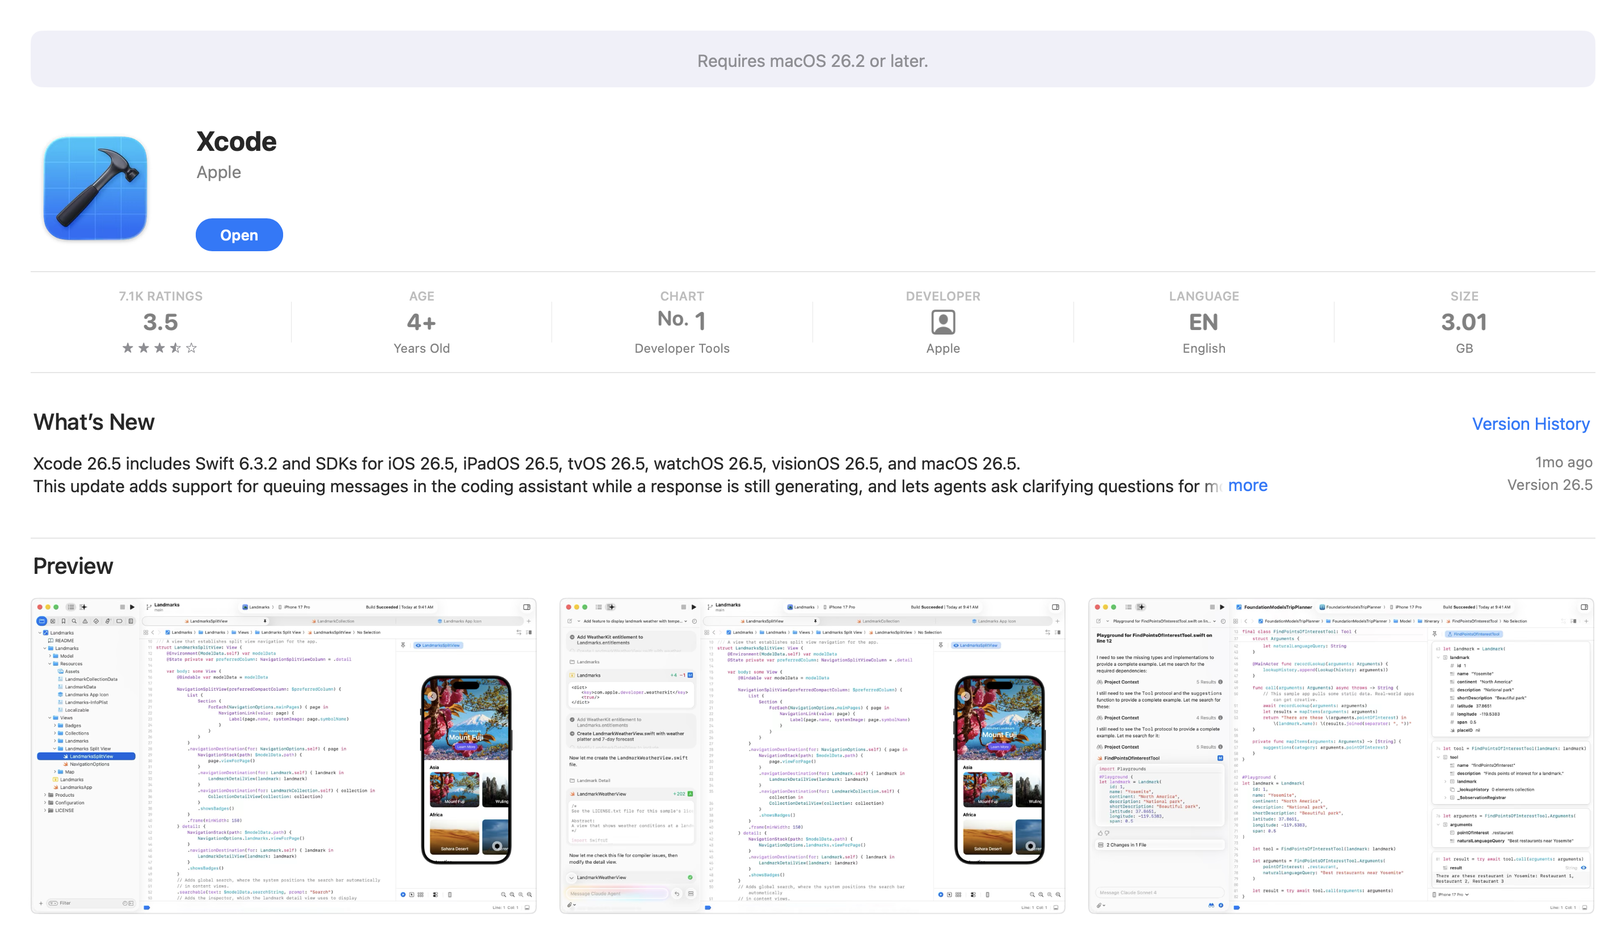
After installation, open Xcode once. If Xcode asks to install additional components or device support, allow it to finish.
Check Xcode from Terminal:
Expected output shape:
Point command line tools at the full Xcode app:
Expected output:
If Xcode asks for a license agreement:
No output is also acceptable if the license was already accepted.
2. Install Homebrew
Install Homebrew from Terminal:
Expected output shape:
==> Installation successful!
==> Next steps:
- Run these commands in your terminal to add Homebrew to your PATH
Follow the exact eval or echo ... >> ~/.zprofile instructions printed by Homebrew.
Verify:
Expected output shape:
3. Install USB and iOS helper tools
Install tools used for diagnostics and fallback device inspection:
Expected output shape:
==> Pouring node--...
==> Pouring ios-deploy--...
==> Pouring libimobiledevice--...
==> Pouring ideviceinstaller--...
Verify Node and npm:
Expected output shape:
Verify USB tools:
Expected output shape:
Install pymobiledevice3 as an optional diagnostic backup.
pymobiledevice3is a Python CLI for inspecting and troubleshooting iOS devices.- The upstream project documents
python3 -m pip install -U pymobiledevice3. - This guide uses
pipxbecause Homebrew-managed Python on macOS often blocks globalpipinstalls. pipxcreates a separate virtual environment for the command and exposespymobiledevice3on your shell path.- If
pipx ensurepathsays it changed your shell path, open a new Terminal tab before runningpymobiledevice3.
Expected output shape:
Success! Added ... to the PATH environment variable.
installed package pymobiledevice3 ...
These apps are now globally available
  - pymobiledevice3
Device:
  Identifier: <masked-device-udid>
  ConnectionType: USB
Appium Setup
4. Install Appium
Install Appium globally with npm:
Expected output:
Install the XCUITest driver:
Expected output shape:
✔ Installing 'xcuitest' using NPM install spec 'appium-xcuitest-driver'
xcuitest@11.14.1 [installed (npm)]
Install Appium Doctor:
Expected output shape:
Use Appium Doctor as a checklist, not as the only source of truth:
Expected output shape:
info AppiumDoctor ### Diagnostic starting ###
info AppiumDoctor  ✔ Xcode is installed
info AppiumDoctor  ✔ xcodebuild exists
Xcode Account and Signing
5. Add an Apple account in Xcode
Open:
Add your Apple account. After sign-in, open the account's Personal Team.
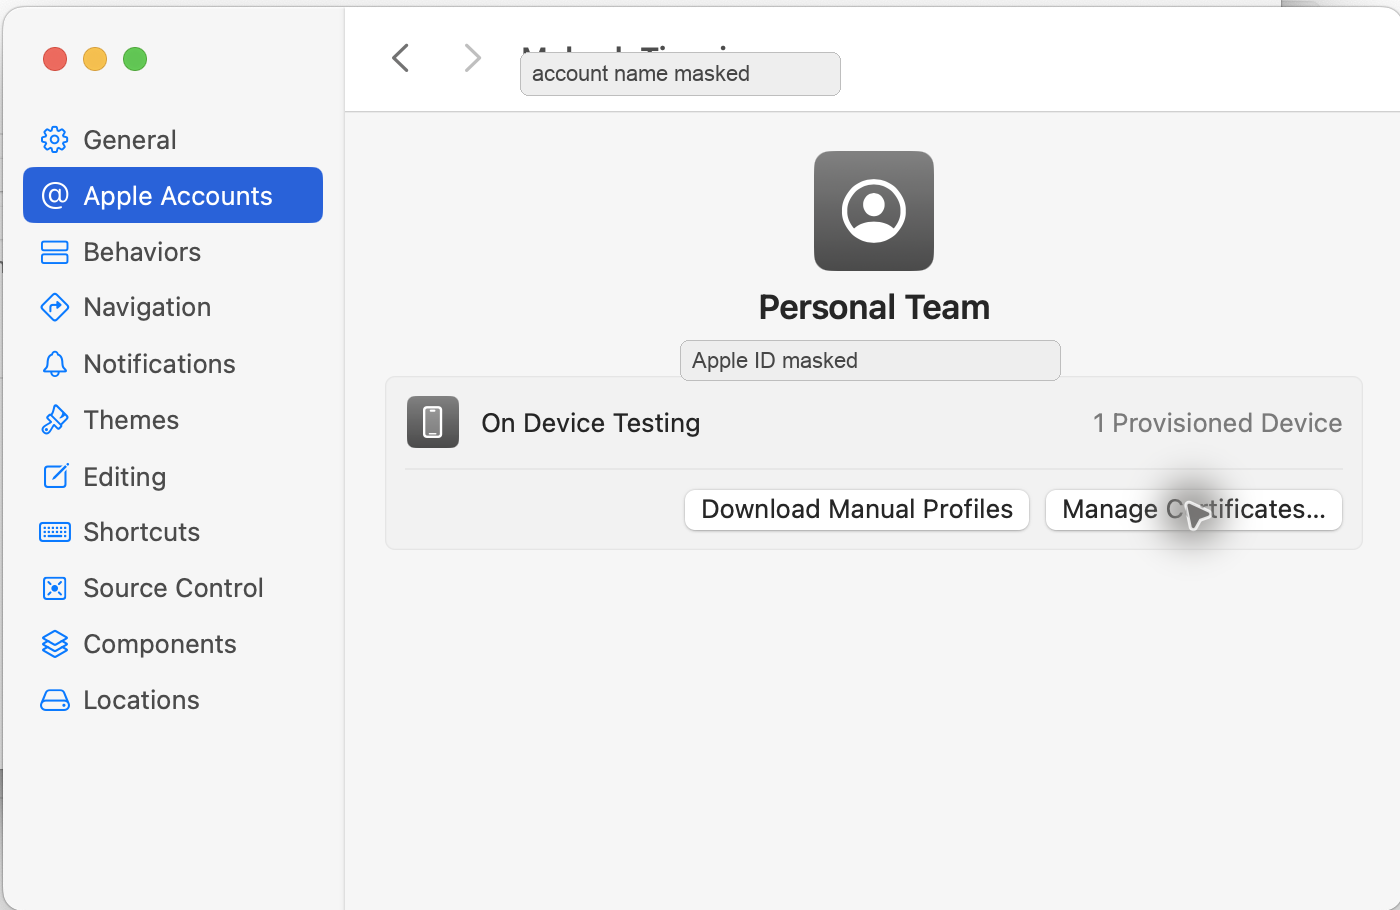
6. Create an Apple Development certificate
In the same team detail screen, click:
If there is no certificate:
- Click
+. - Choose
Apple Development. - Wait for Xcode to create the certificate.
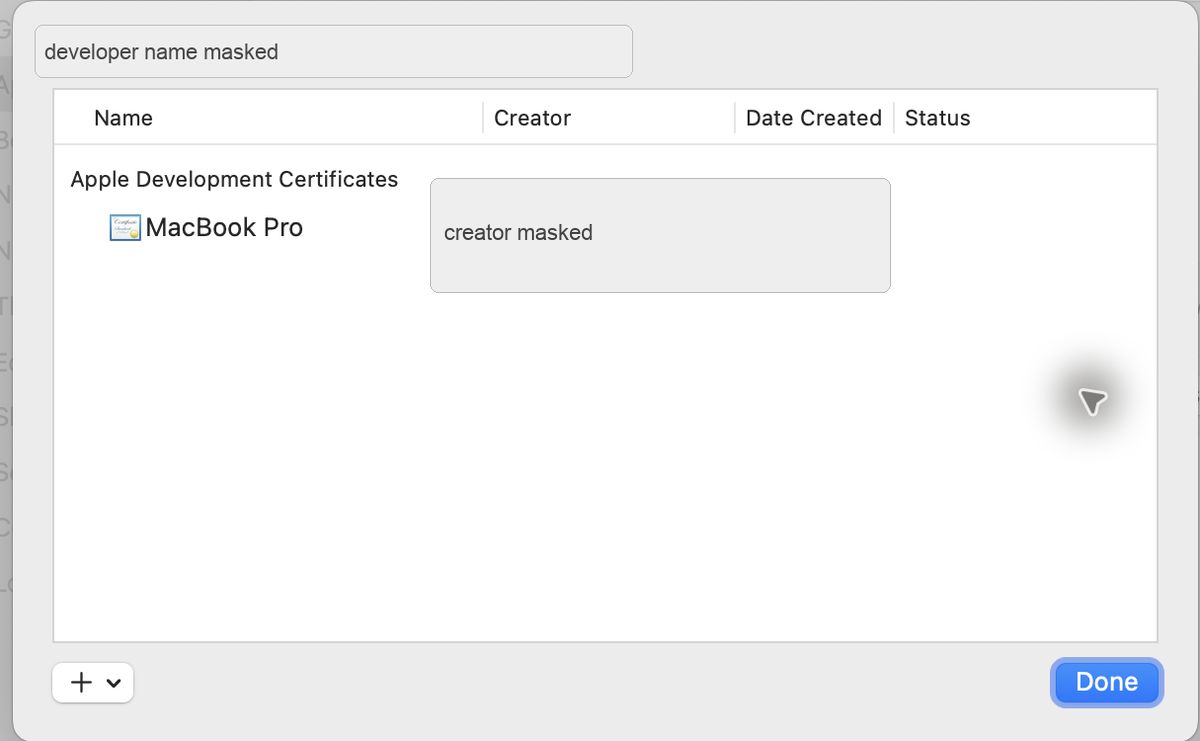
The certificate and private key stay in the Mac keychain. Do not paste keychain exports, .p12 files, or certificate passwords into documentation.
iPhone Setup
7. Connect and trust the iPhone
Connect the iPhone to the Mac with a USB cable.
On the iPhone, accept:
Enter the iPhone passcode if prompted.
This trust popup appears before Appium can capture screenshots. Verify the result in Xcode instead:
The iPhone should appear under Connected.
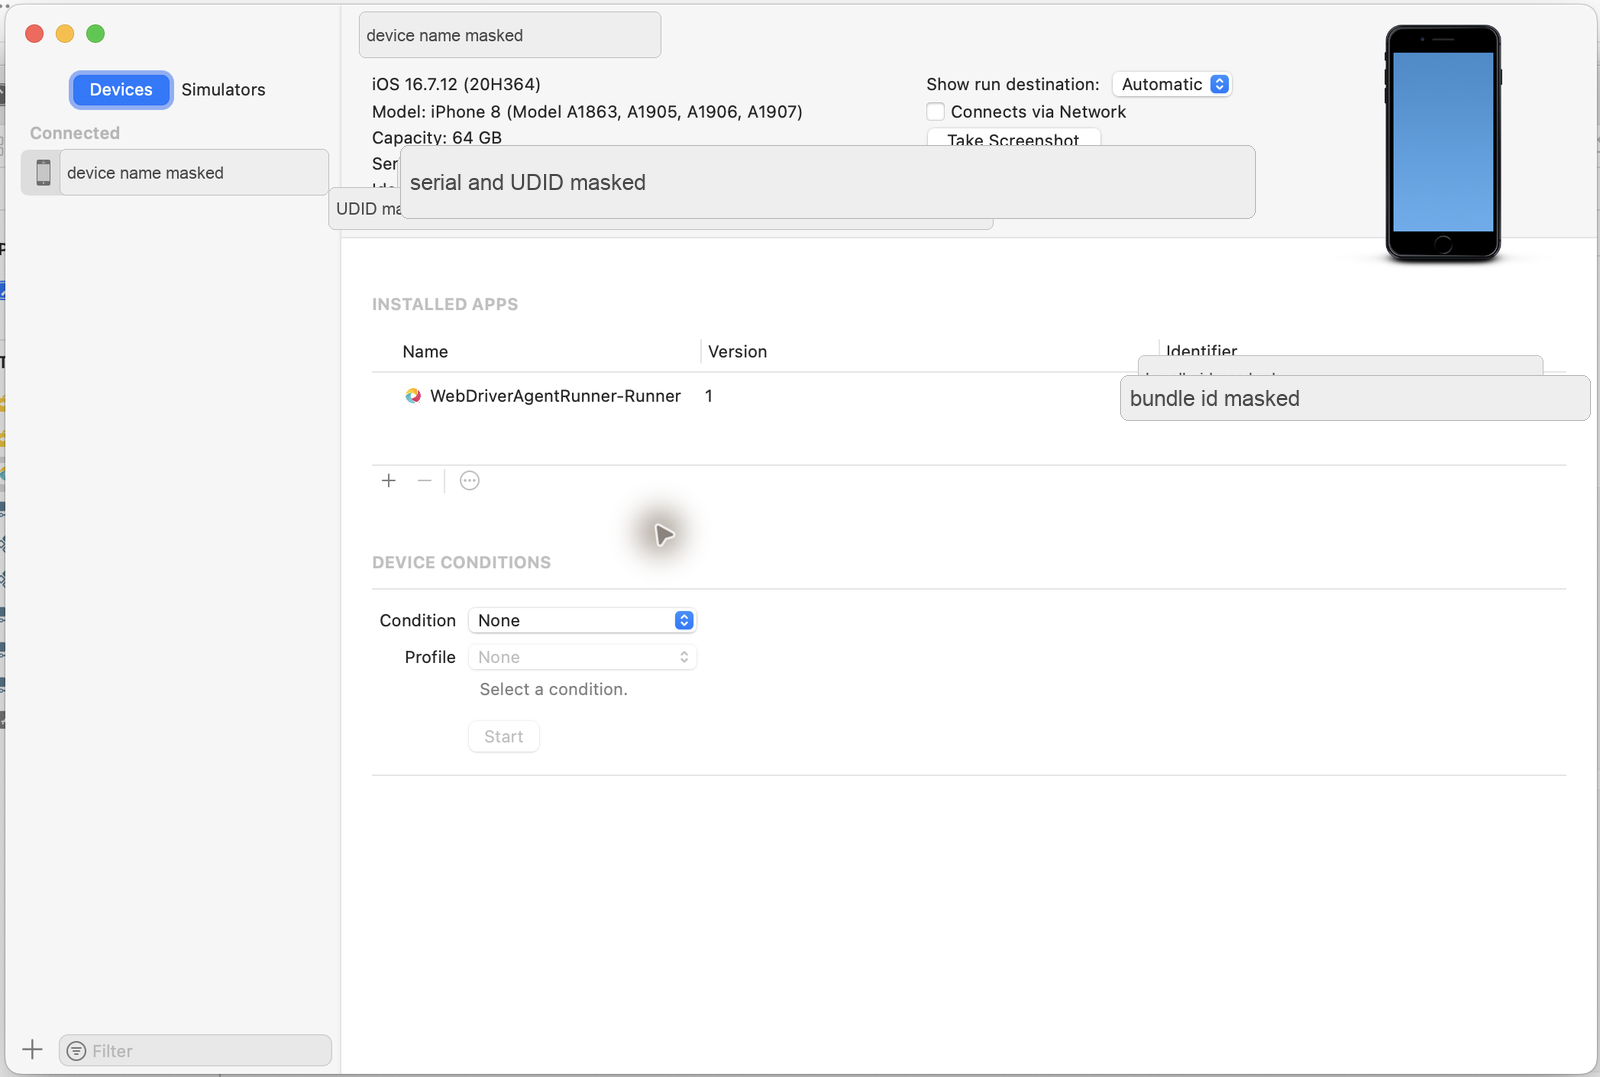
Verify from Terminal:
Expected output shape:
Also verify USB visibility:
Expected output shape:
8. Keep the iPhone stable during setup
On the iPhone, keep these temporary setup defaults:
- Keep the phone unlocked.
- Keep the USB cable connected.
- Disable short auto-lock temporarily.
- Stay near the Home screen or Settings app during first setup.
- Avoid passcode prompts while WebDriverAgent is launching.
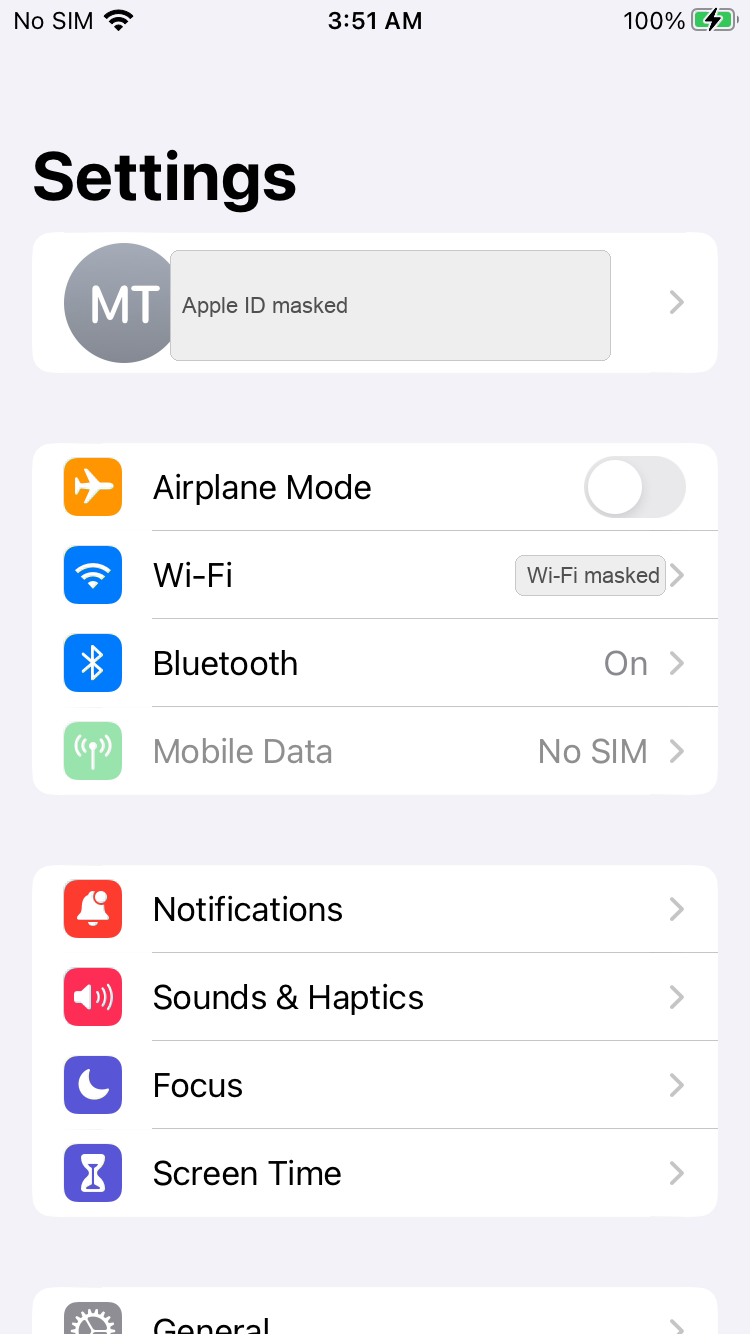
Start from the iPhone Settings app:
9. Enable Developer Mode
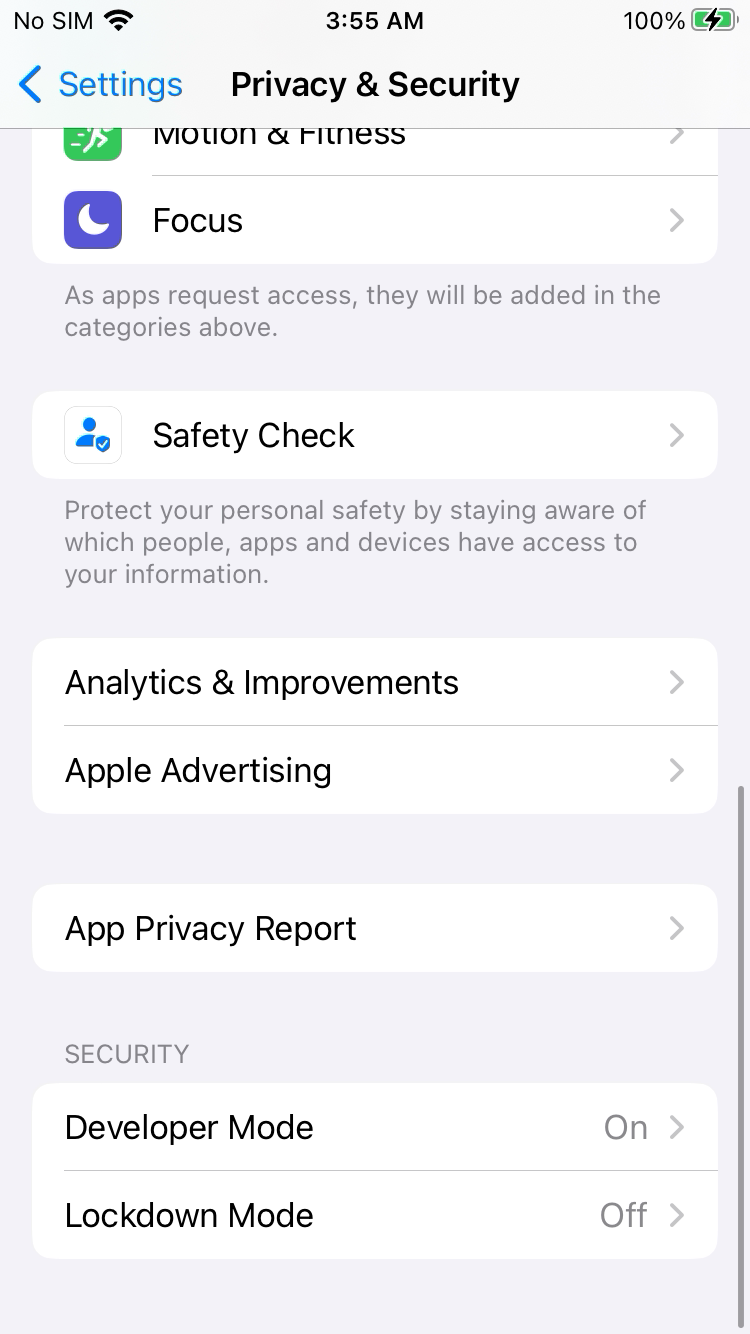
Open:
Developer Mode appears near the bottom of Privacy & Security.
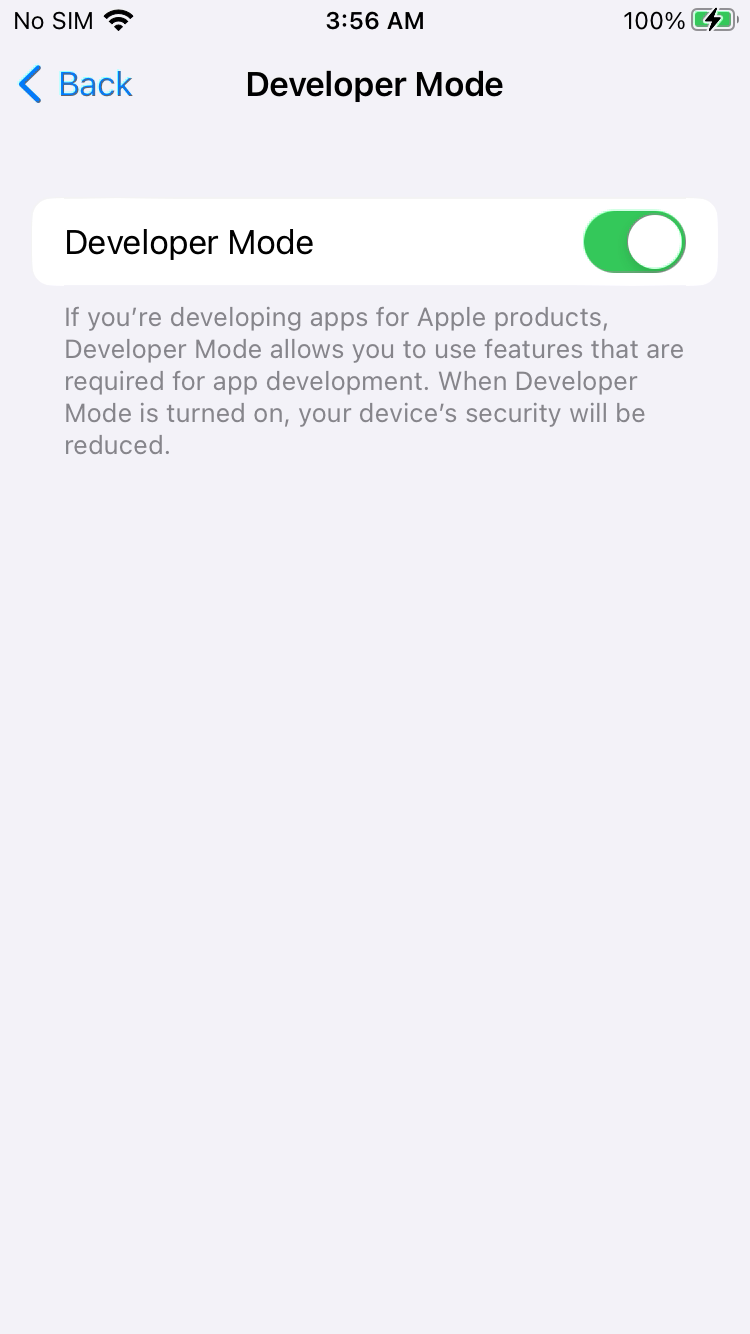
Open Developer Mode, turn it on, and restart the iPhone if iOS asks.
10. Enable UI Automation
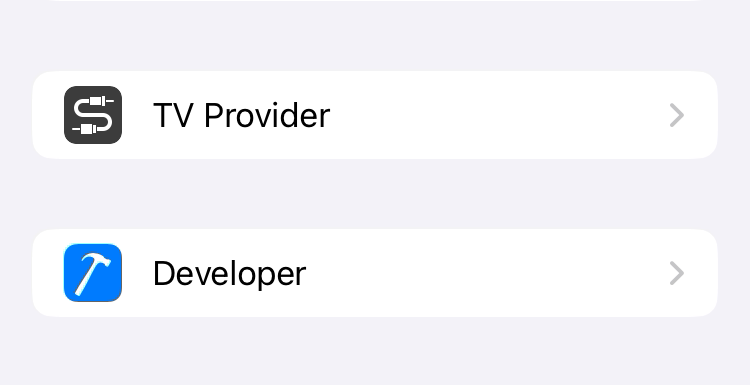
Open:
The Developer row appears in Settings after Developer Mode is available.
Turn on:
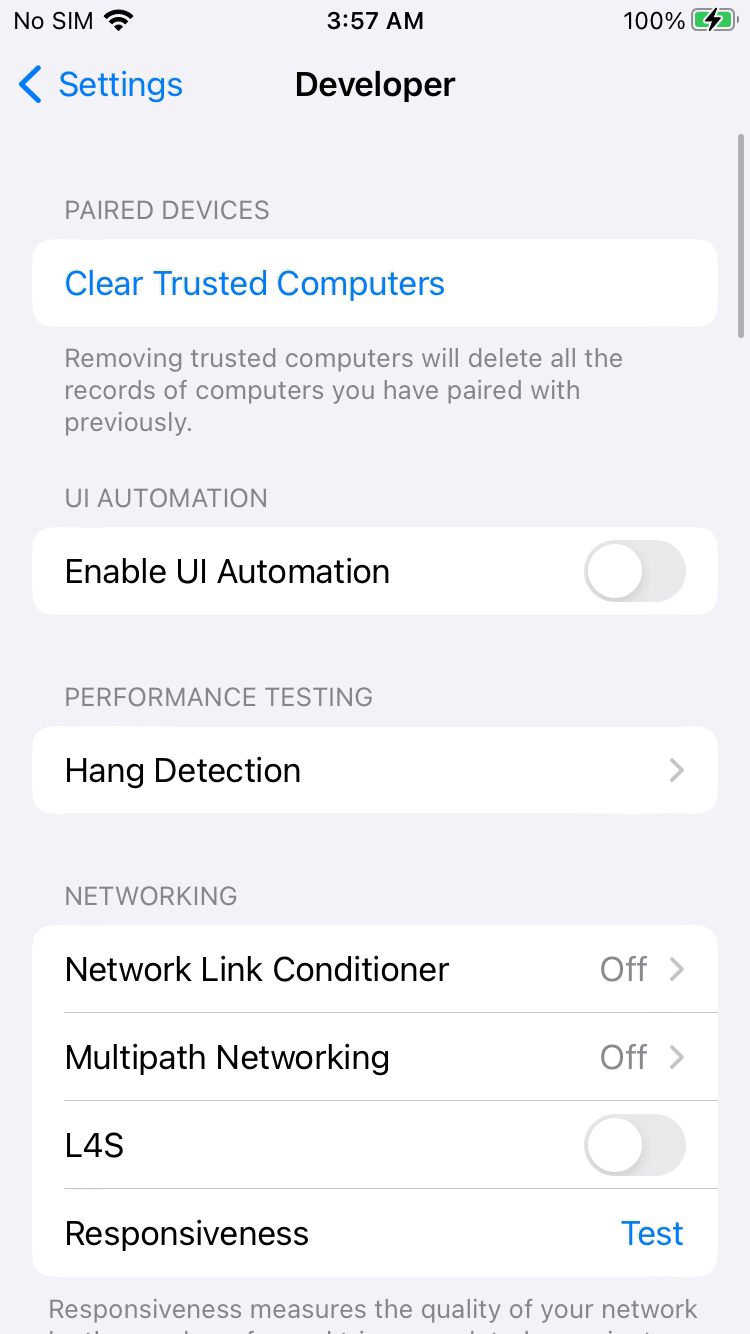
Why this is required:
Enable UI Automationallows XCTest-based tools to inspect and control the iPhone UI.- Appium does not directly control the iPhone screen by itself. Appium talks to WebDriverAgent, and WebDriverAgent uses Apple's XCTest UI automation APIs.
- If UI Automation is disabled, WebDriverAgent may still install, but Appium commands such as screenshot, source, tap, swipe, and app launch can fail or behave inconsistently.
- Keep this setting enabled when using Appium with the XCUITest driver, WebDriverAgentRunner, XCTest UI tests, or any local tool that needs to automate visible iPhone UI.
This setting is different from Developer Mode:
Developer Modeallows development-signed apps such as WebDriverAgentRunner to run.Enable UI Automationallows XCTest automation to interact with the visible UI.- For normal Appium real-device use, both should be enabled.
11. Enable Safari Web Inspector
This step is required only if you want Appium to test websites in Mobile Safari. It is separate from Enable UI Automation.
Open:
Scroll until the Safari row is visible.
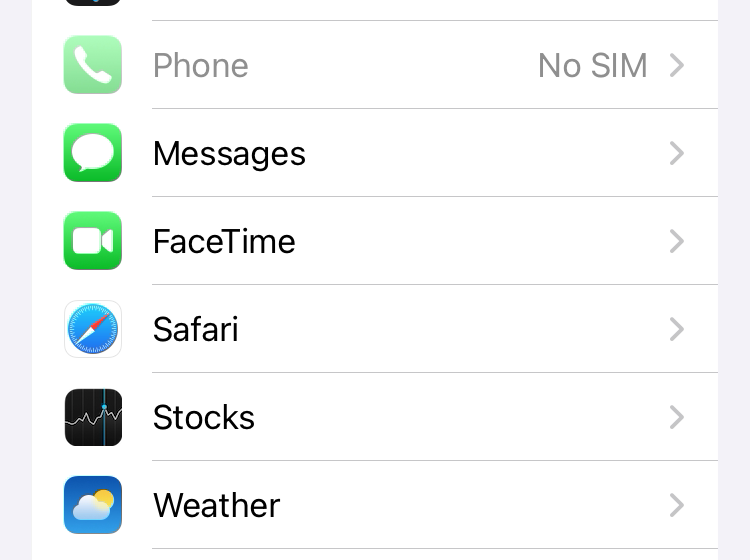
Open Safari.
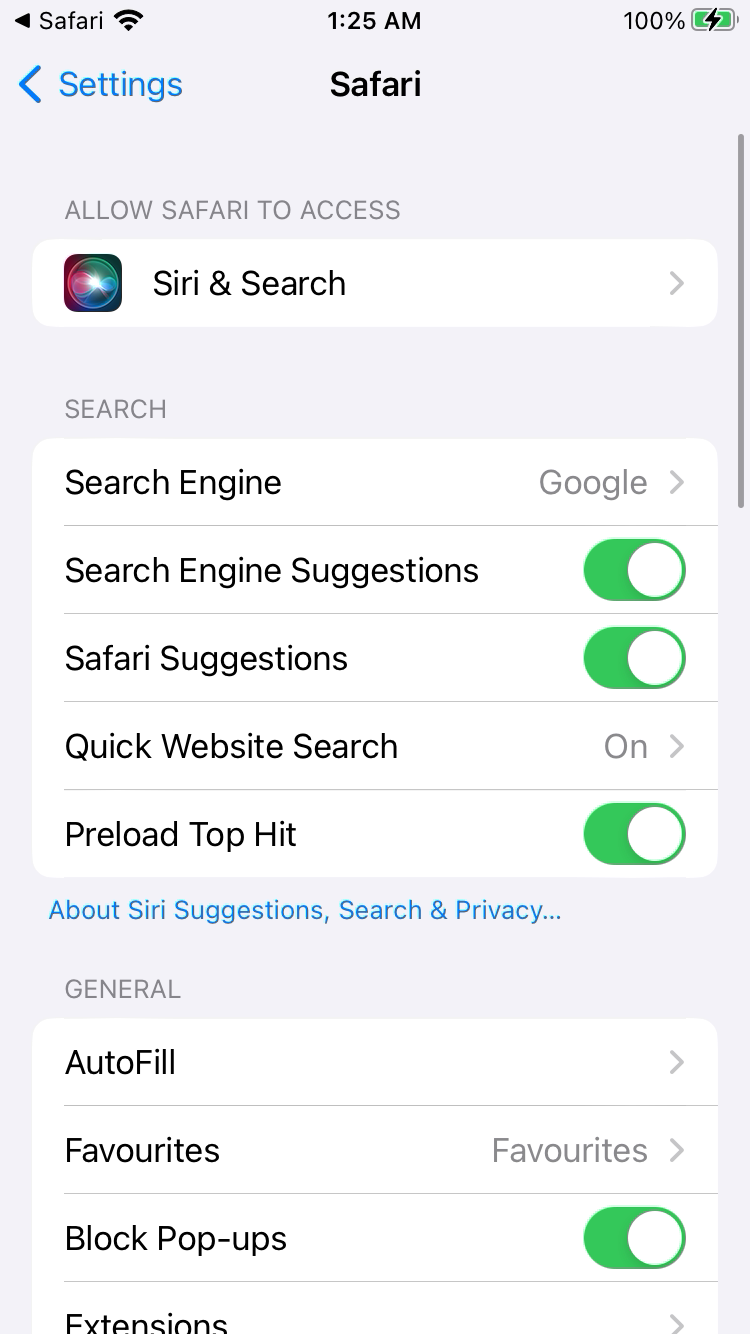
Open:
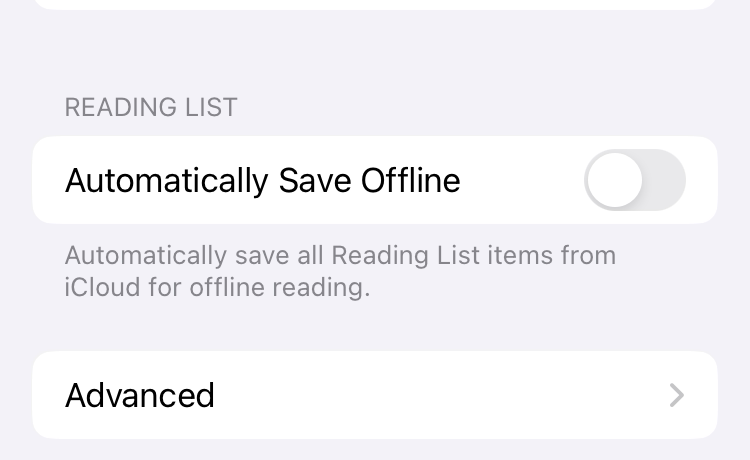
Turn on:
Leave JavaScript enabled.
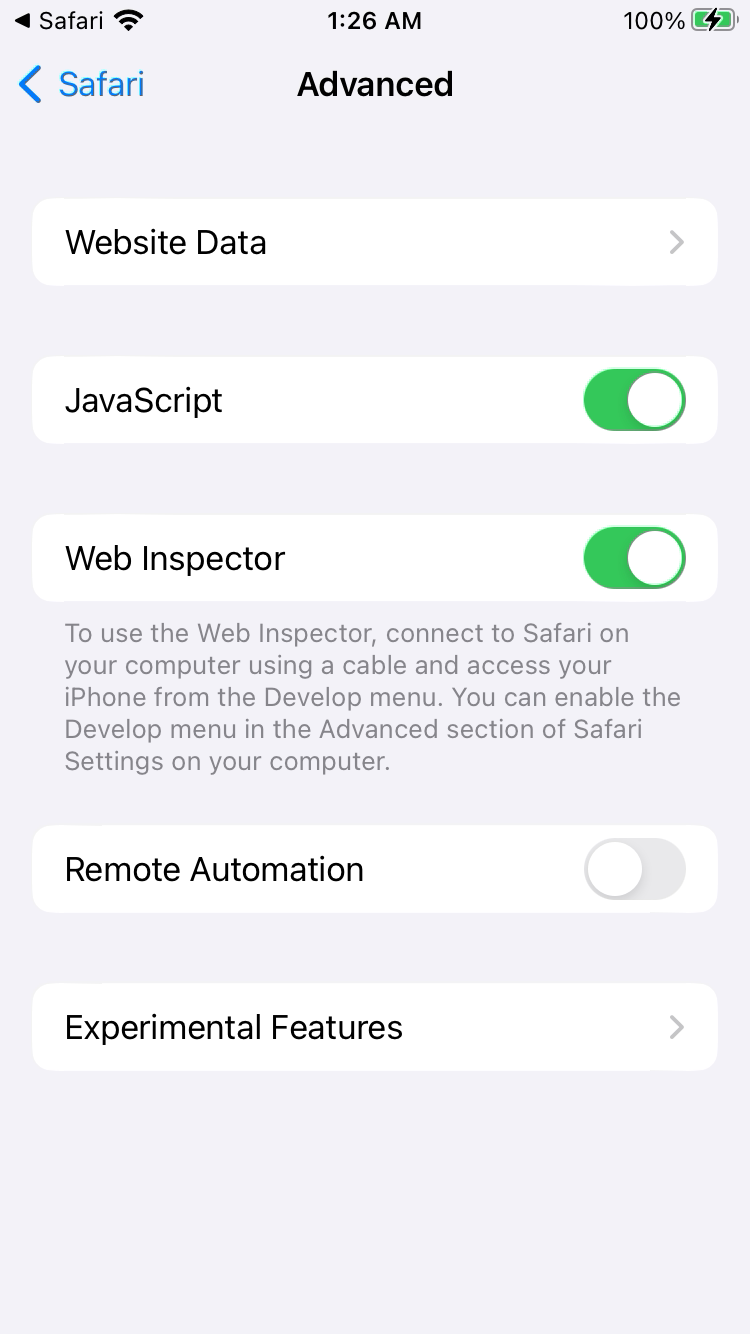
Why this is required:
- Native Appium commands use WebDriverAgent and XCTest.
- Mobile Safari web commands use Safari's Web Inspector connection so Appium can see web pages, DOM source, CSS selectors, and page titles.
- If
Web Inspectoris off, Safari may open, but Appium can fail withThe remote debugger did not return any connected web applications. Remote Automationis not required for the Appium/XCUITest flow verified here. Keep it off unless a different Safari automation stack explicitly requires it.
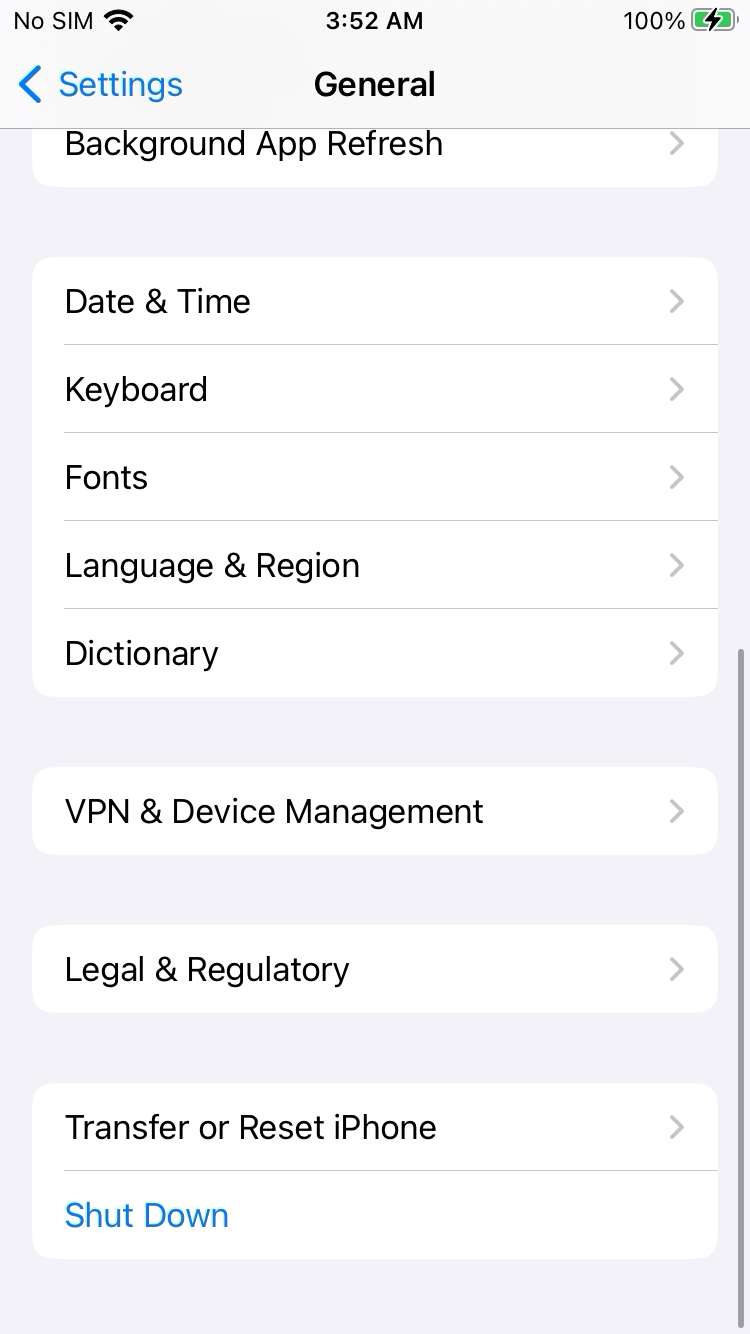
12. Trust the WebDriverAgent developer app
After WebDriverAgent is installed for the first time, open:
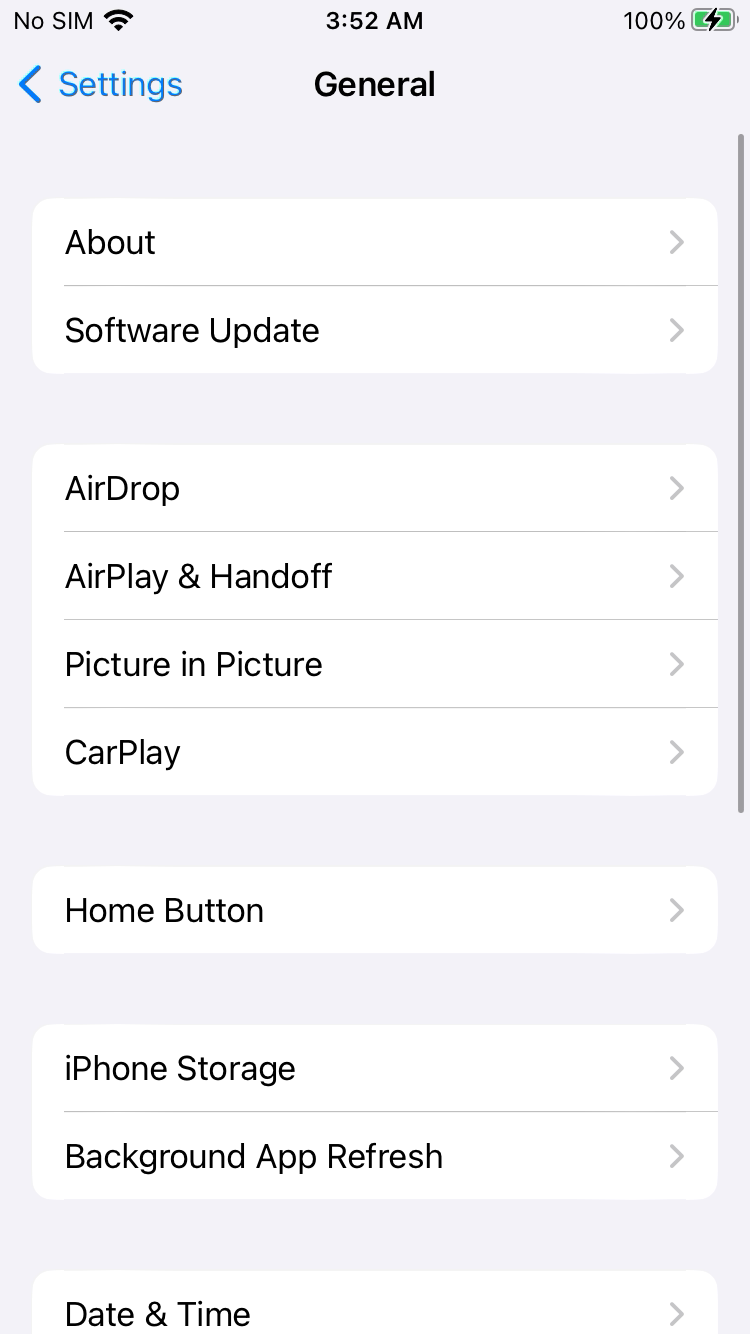
Scroll to VPN & Device Management.
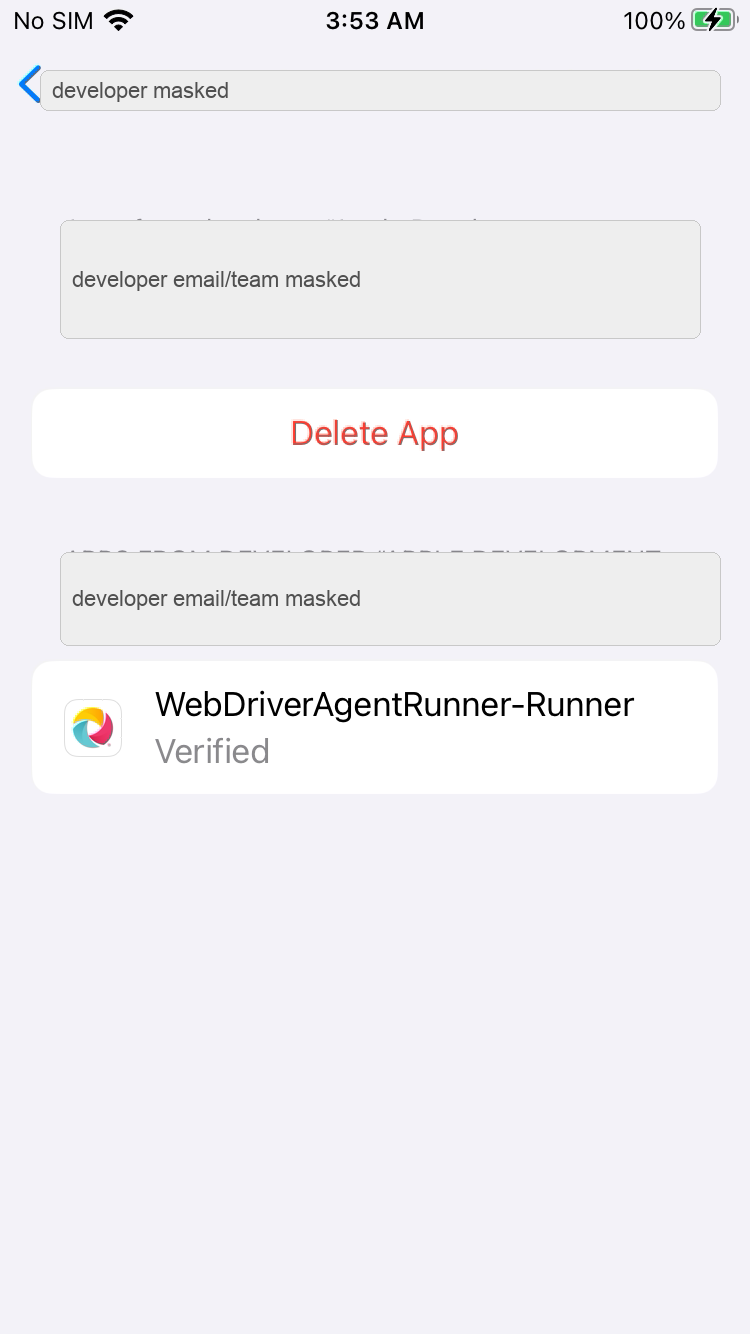
Open the developer app profile.
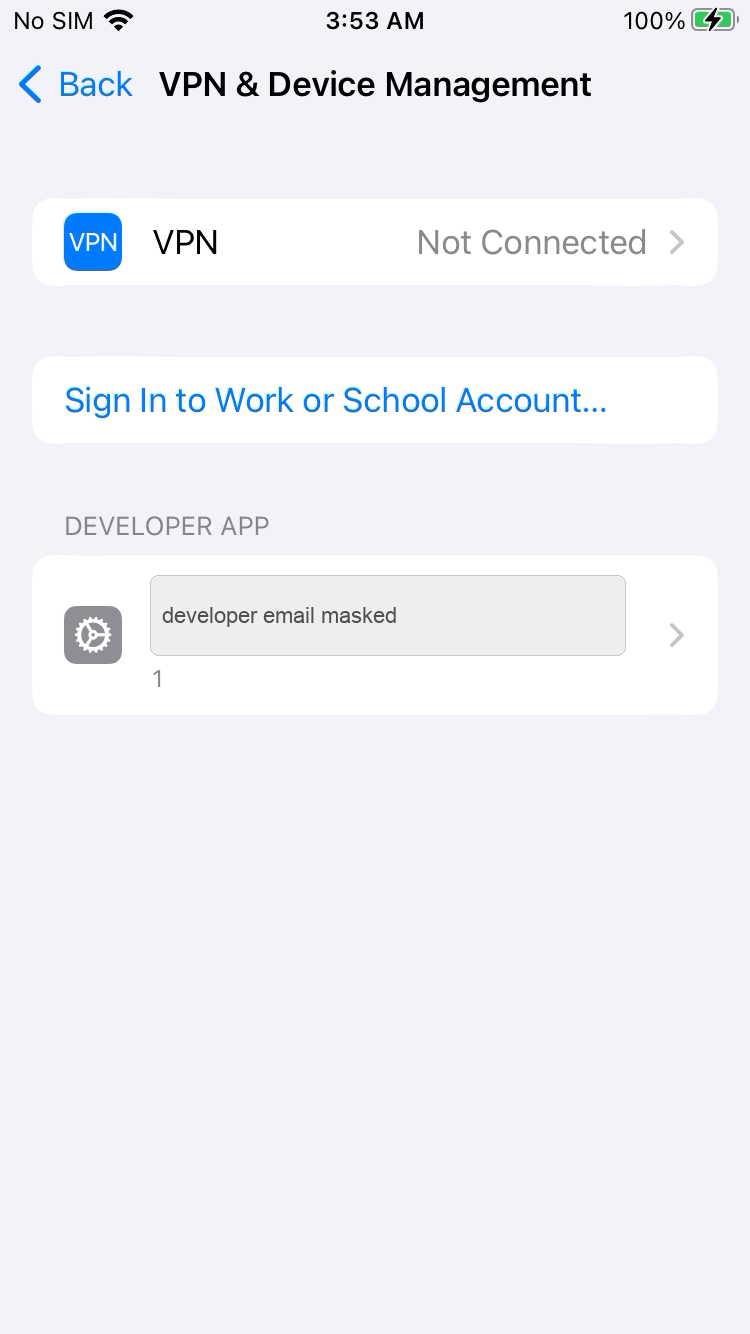
Trust the developer profile if iOS asks. A trusted WebDriverAgent profile looks like this:
WebDriverAgent Setup
13. Locate WebDriverAgent
After installing the XCUITest driver, WebDriverAgent is inside the Appium driver folder.
Find it:
Expected output shape:
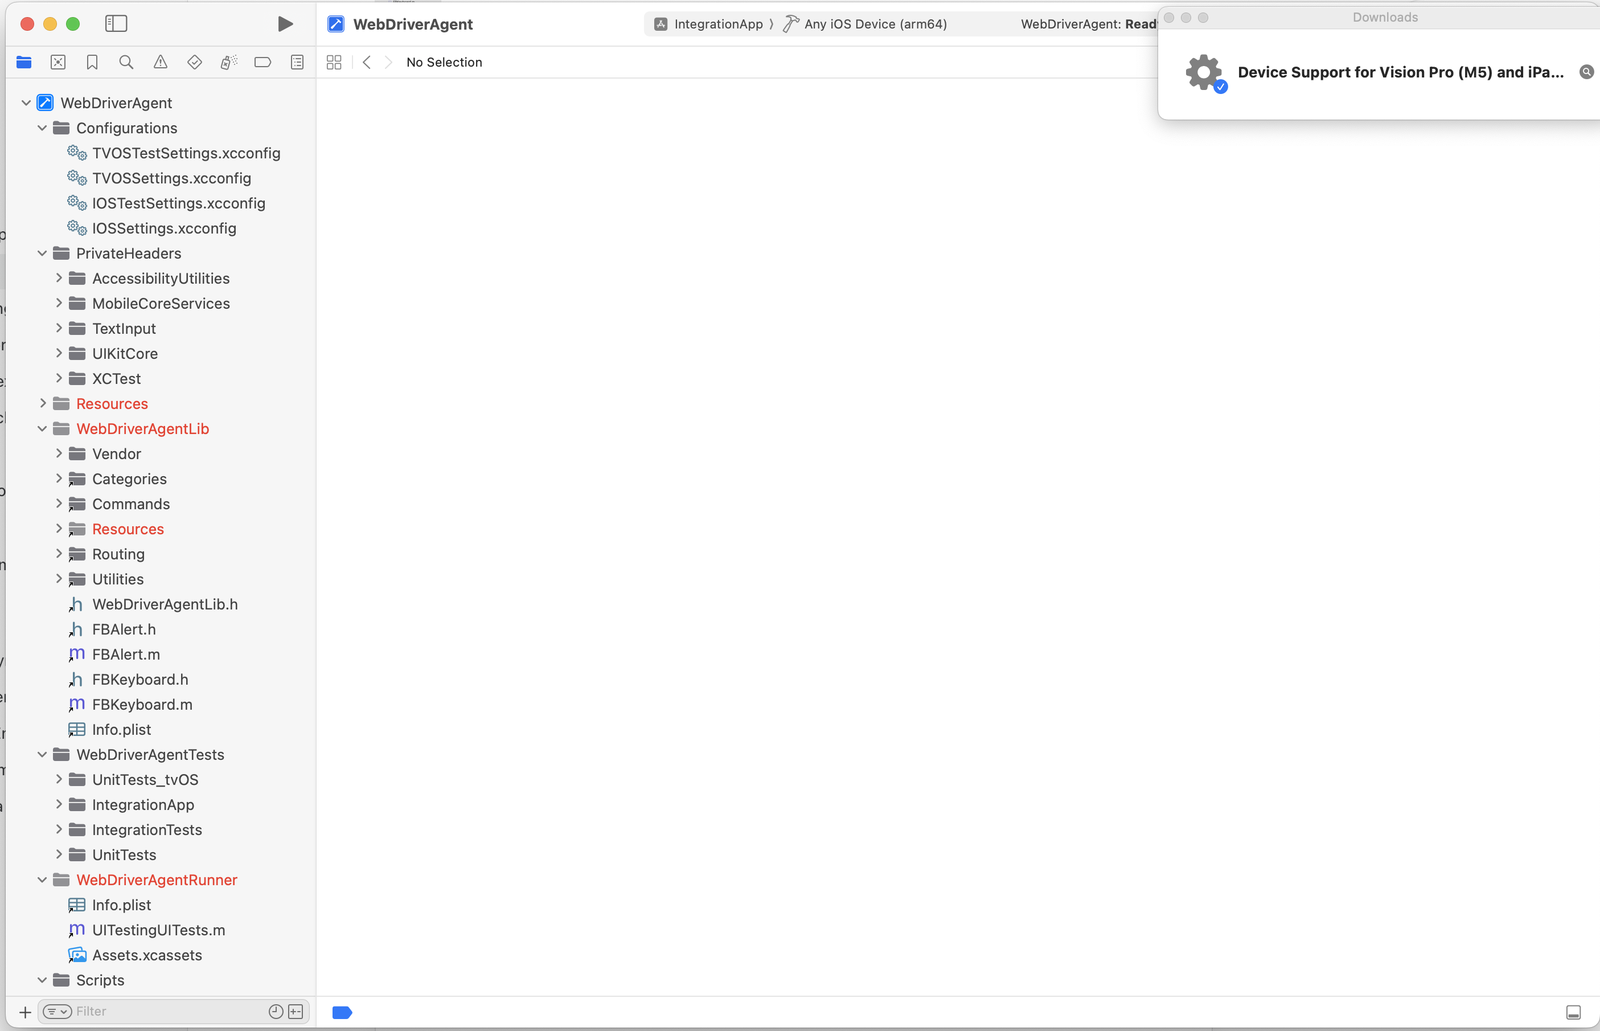
/Users/<mac-user>/.appium/node_modules/appium-xcuitest-driver/node_modules/appium-webdriveragent/WebDriverAgent.xcodeproj
Open it:
14. Understand the signing failure
If Xcode shows this error, the project has no development team selected:
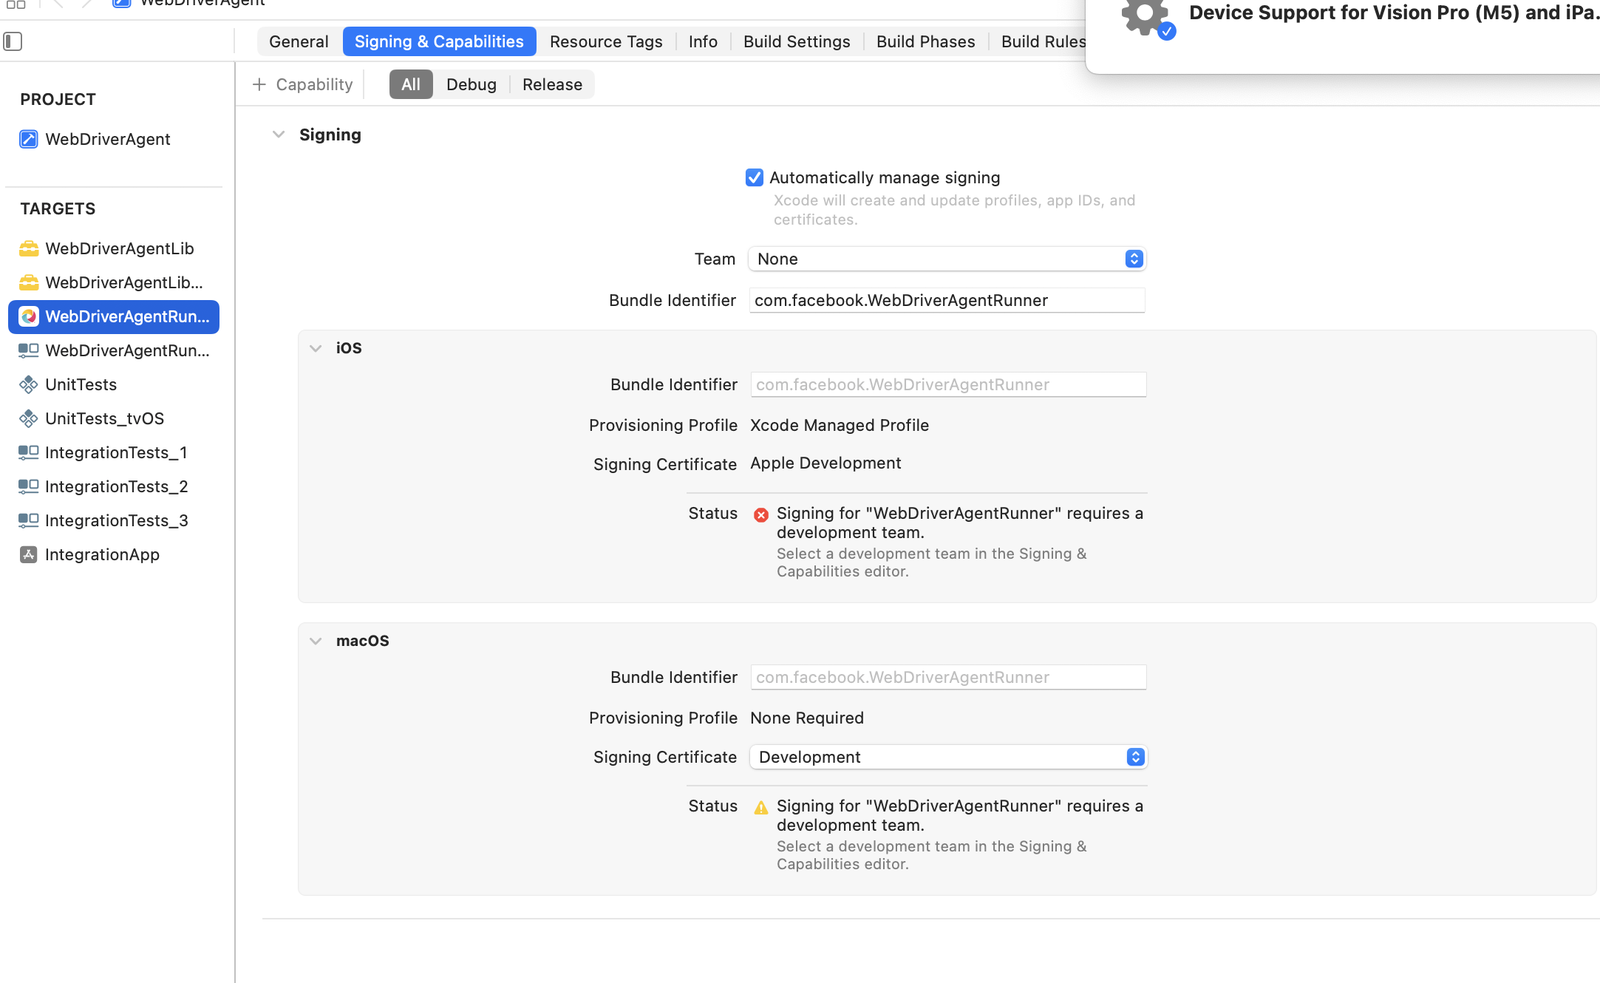
There are two valid ways to fix it.
Recommended for repeatable Appium sessions:
- Do not manually edit the Appium-installed WebDriverAgent project.
- Pass signing values as Appium capabilities.
- Use
appium:xcodeOrgId,appium:xcodeSigningId, andappium:updatedWDABundleId.
Xcode terms that matter during WDA signing
Xcode has several similarly named areas. For WebDriverAgent signing, the difference matters.
- Project: the top-level
.xcodeprojcontainer. Clicking only the project row is not enough. - Target: a buildable component inside the project. Signing is configured on targets.
- WebDriverAgentLib: the shared library target used by WebDriverAgent.
- WebDriverAgentRunner: the XCTest runner target that Appium installs and launches on the iPhone.
- Scheme: the selected build/run recipe in Xcode's toolbar. For WDA, the important scheme is usually
WebDriverAgentRunner. - Signing & Capabilities: the Xcode tab where the team, certificate, bundle ID, provisioning profile, and entitlements are resolved.
Most first-time failures happen because the project is selected instead of the WebDriverAgentRunner target. Always check the TARGETS list before changing signing.
Manual WDA signing fallback: exact Xcode clicks
Use this fallback only if Appium capabilities are not enough or if you want Xcode to show the signing state visually.
- Open the WebDriverAgent project in Xcode.
- In the left sidebar, open the Project Navigator. This is the folder icon in the top-left area of Xcode.
- Click the top-level
WebDriverAgentproject entry. - In the main editor, find the list labeled
TARGETS. - Click
WebDriverAgentRunner. Do not click only the top-level project row. - Open the
Signing & Capabilitiestab. - Check
Automatically manage signing. - If Xcode asks whether it should enable automatic signing or reset provisioning profiles, allow it.
- In
Team, select your Apple account'sPersonal Team. - Change
Bundle Identifierfrom the default value to a unique value, for examplecom.example.WebDriverAgentRunner. - Wait for Xcode to finish resolving signing.
- Confirm the provisioning profile changes to an Xcode-managed profile.
- Confirm the signing certificate shows
Apple Development.
The target list and final signed state should look like this:
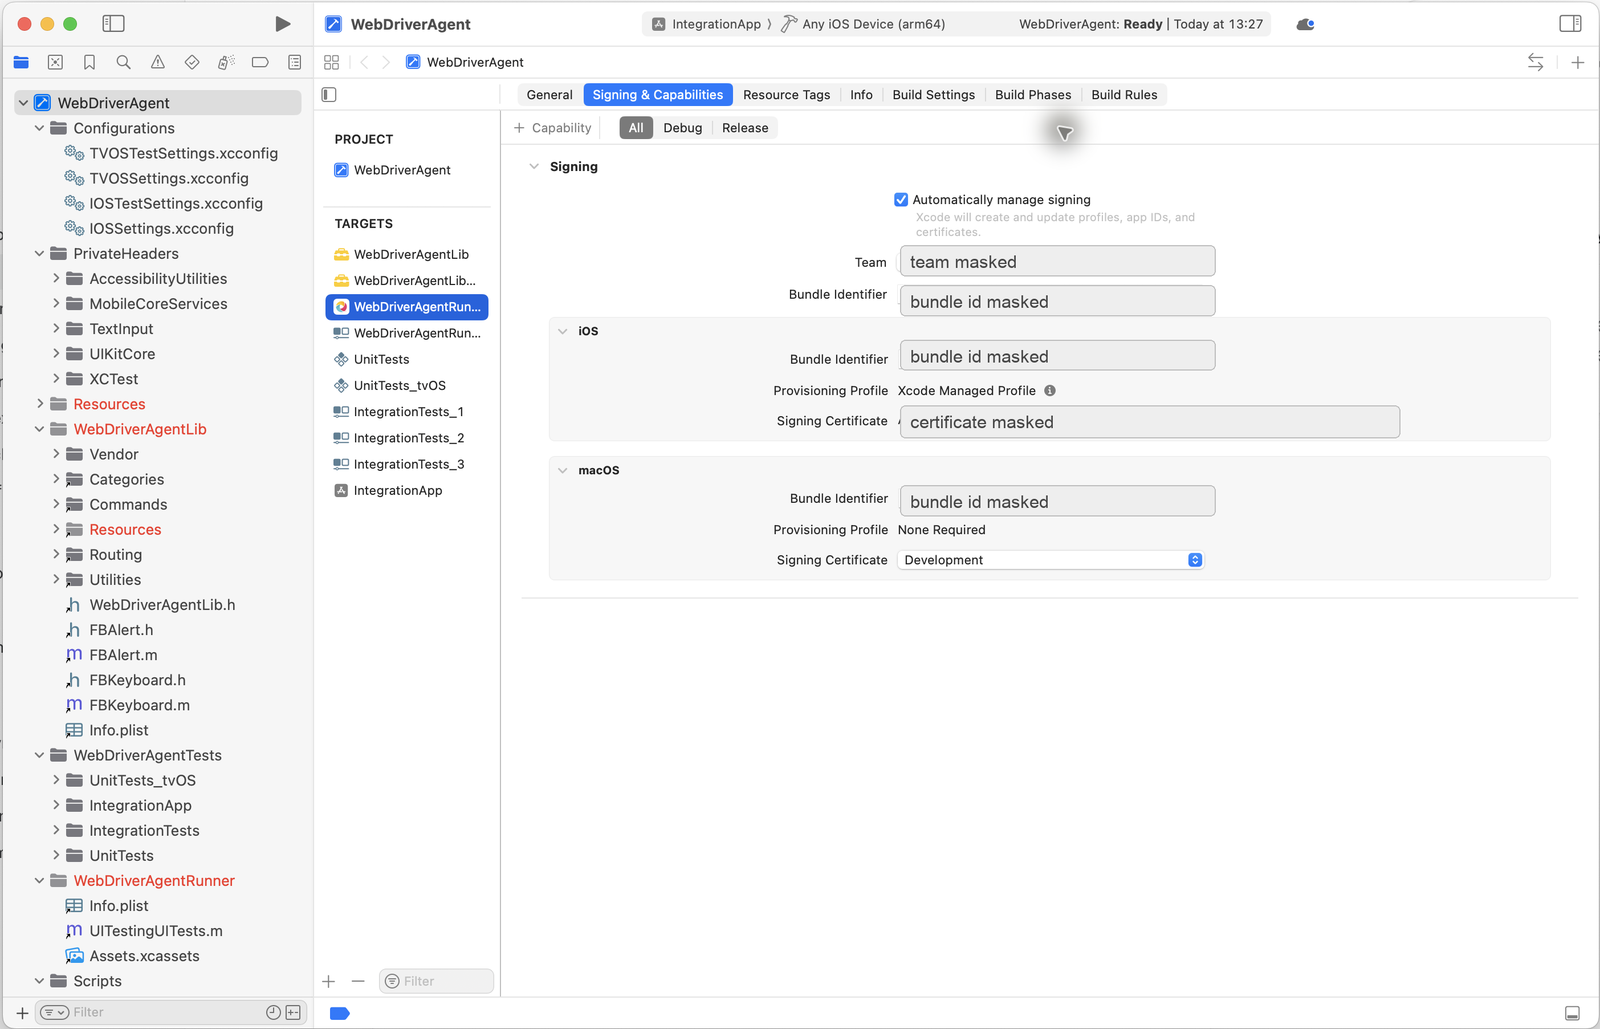
If Xcode reports a signing error for WebDriverAgentLib, select the WebDriverAgentLib target and apply the same team. Do not change its bundle identifier unless Xcode explicitly requires it.
Expected good state:
Target: WebDriverAgentRunner
Signing: Automatically manage signing
Team: <your personal team>
Bundle Identifier: <your unique WDA bundle id>
Provisioning Profile: Xcode Managed Profile
Signing Certificate: Apple Development
If Xcode shows Failed to register bundle identifier, the default bundle identifier is probably already used by another developer. Change Bundle Identifier to a unique reverse-DNS value and wait again.
WDA signing readiness checklist
Do not start Appium session debugging until this checklist is clean:
WebDriverAgentRunnertarget is selected, not just the project row.Teamis notNone.- Bundle identifier is unique.
- Provisioning profile is resolved.
- Signing certificate says
Apple Development. - The physical iPhone is connected, unlocked, and trusted.
- Developer Mode is enabled on the iPhone.
Enable UI Automationis enabled on the iPhone.- No red signing error remains in Xcode.
Stop and fix signing first if any checklist item fails. Reinstalling Appium or changing random capabilities will not fix an unresolved WDA signing problem.
Start Appium
15. Start the Appium server
Run:
Expected output shape:
[Appium] Welcome to Appium v3.5.2
[Appium] Appium REST http interface listener started on http://127.0.0.1:4723
[Appium] Available drivers:
[Appium]   - xcuitest@...
Leave this terminal running. Binding Appium to 127.0.0.1 keeps the automation server local to the Mac. Do not expose Appium on a network interface unless you intentionally need remote access and have a security boundary around it.
From another terminal, check server status:
Expected output shape:
16. Create a real-device session
Replace placeholders before running:
<device-name><ios-version><device-udid><team-id><unique-wda-bundle-id>
Use these capabilities deliberately:
| Capability | Why it matters |
|---|---|
appium:udid |
Selects the exact physical iPhone. Use this when more than one simulator or device exists. |
appium:xcodeOrgId |
Apple Team ID used to sign WebDriverAgent. |
appium:xcodeSigningId |
Signing identity. For this setup, use Apple Development. |
appium:updatedWDABundleId |
Unique bundle ID Appium uses for WebDriverAgentRunner. |
appium:wdaLaunchTimeout |
Gives WebDriverAgent enough time to build, install, and start on a real iPhone. |
appium:mjpegServerPort |
Local Mac port where Appium forwards WDA's MJPEG screenshot stream. Default is 9100; set it explicitly so the URL is predictable. |
appium:newCommandTimeout |
Keeps the session alive during slower manual checks. |
appium:noReset |
Avoids resetting app/device state between sessions. |
Automation setup stop rule:
- If
xcrun xctrace list devicesdoes not show the iPhone, fix USB/trust/device detection first. - If Xcode still shows WDA signing errors, fix signing before changing Appium capabilities.
- If Appium starts but session creation fails, read the first signing or WDA launch error before retrying.
- If two session attempts fail the same way, stop and fix the root cause instead of repeatedly restarting Appium.
curl -sS -X POST http://127.0.0.1:4723/session \
  -H 'Content-Type: application/json' \
  -d '{
    "capabilities": {
      "alwaysMatch": {
        "platformName": "iOS",
        "appium:automationName": "XCUITest",
        "appium:deviceName": "<device-name>",
        "appium:platformVersion": "<ios-version>",
        "appium:udid": "<device-udid>",
        "appium:bundleId": "com.apple.Preferences",
        "appium:xcodeOrgId": "<team-id>",
        "appium:xcodeSigningId": "Apple Development",
        "appium:updatedWDABundleId": "<unique-wda-bundle-id>",
        "appium:wdaLaunchTimeout": 120000,
        "appium:mjpegServerPort": 9100,
        "appium:newCommandTimeout": 120
      },
      "firstMatch": [{}]
    }
  }'
Expected output shape:
{
  "value": {
    "sessionId": "<appium-session-id>",
    "capabilities": {
      "platformName": "iOS",
      "automationName": "XCUITest"
    }
  }
}
Keep the sessionId. The examples below use:
Verify Control
17. Take a screenshot
curl -sS "http://127.0.0.1:4723/session/$SID/screenshot" \
  | python3 -c 'import sys,json,base64; print(json.load(sys.stdin)["value"])' \
  | base64 --decode > iphone-appium-screenshot.png

file iphone-appium-screenshot.png
Expected output:
18. Watch the live iPhone screen stream
For slow setup checks, one screenshot is enough. For fast-changing apps or games, use WebDriverAgent's MJPEG stream instead.
This stream is enabled by the XCUITest/WebDriverAgent stack when WDA is running. WDA runs on the iPhone as WebDriverAgentRunner; the XCUITest driver forwards WDA's MJPEG stream back to the Mac. The URL you open on the Mac is a forwarded local endpoint, not a separate video server rendered by Appium.
The stream is MJPEG, not H.264 or AirPlay-style screen mirroring. In practice, it is a continuous sequence of JPEG screenshots. It is useful for live debugging and visual observation, while all control commands still go through the normal Appium session.
With the session running, check the three local ports:
curl -sS http://127.0.0.1:4723/status
curl -sS http://127.0.0.1:8100/status | python3 -m json.tool | sed -n '1,40p'
curl -sS --max-time 2 -I http://127.0.0.1:9100/ | sed -n '1,20p'
Expected output shape:
HTTP/1.0 200 OK
Server: WDA MJPEG Server
Content-Type: multipart/x-mixed-replace; boundary=--BoundaryString
Headers prove the MJPEG server is reachable. To prove real iPhone screen frames are flowing, capture a short burst and extract JPEG frames from the multipart response:
rm -f /tmp/wda-mjpeg.bin /tmp/wda-frame-*.jpg
curl -sS --max-time 3 http://127.0.0.1:9100/ -o /tmp/wda-mjpeg.bin || true

python3 - <<'PY'
from pathlib import Path

blob = Path('/tmp/wda-mjpeg.bin').read_bytes()
frames = []
pos = 0

while True:
    start = blob.find(b'\xff\xd8', pos)
    if start < 0:
        break
    end = blob.find(b'\xff\xd9', start + 2)
    if end < 0:
        break
    frames.append((start, end + 2))
    pos = end + 2

print('bytes', len(blob))
print('jpeg_frames', len(frames))

for index, (start, end) in enumerate(frames[:3], 1):
    out = Path(f'/tmp/wda-frame-{index}.jpg')
    out.write_bytes(blob[start:end])
    print(out, end - start)
PY

file /tmp/wda-frame-*.jpg
Expected output shape:
If the header check passes but jpeg_frames is 0, the stream endpoint is reachable but frame delivery is not working. Restart the Appium session, unlock the phone, confirm WDA is ready on 8100, and retry the capture.
Open the stream in a browser or another viewer:
How to read the ports:
4723is the Appium server. Send WebDriver commands here.8100is WebDriverAgent's HTTP endpoint, proxied locally by Appium for a real device.9100is the Mac-side forwarded port for WebDriverAgent's MJPEG screenshot stream. The default is9100unless you setappium:mjpegServerPortto another value.
The MJPEG stream is for watching the screen. Continue sending taps, swipes, text input, and app commands through Appium on 4723.
If port 9100 is already busy, choose a different value such as 9110 in appium:mjpegServerPort, then open http://127.0.0.1:9110/.
19. Read UI source
Expected output shape:
20. Tap a harmless coordinate
This example taps near the center of the screen. Use it only on a harmless screen such as Settings.
curl -sS -X POST "http://127.0.0.1:4723/session/$SID/actions" \
  -H 'Content-Type: application/json' \
  -d '{
    "actions": [{
      "type": "pointer",
      "id": "finger1",
      "parameters": { "pointerType": "touch" },
      "actions": [
        { "type": "pointerMove", "duration": 0, "x": 190, "y": 320, "origin": "viewport" },
        { "type": "pointerDown", "button": 0 },
        { "type": "pause", "duration": 80 },
        { "type": "pointerUp", "button": 0 }
      ]
    }]
  }'
Expected output:
21. Press Home
curl -sS -X POST "http://127.0.0.1:4723/session/$SID/execute/sync" \
  -H 'Content-Type: application/json' \
  -d '{"script":"mobile: pressButton","args":[{"name":"home"}]}'
Expected output:
22. Open Settings again
curl -sS -X POST "http://127.0.0.1:4723/session/$SID/appium/device/activate_app" \
  -H 'Content-Type: application/json' \
  -d '{"bundleId":"com.apple.Preferences"}'
Expected output:
23. End the session
Always delete the Appium session when finished:
Expected output:
Stop the Appium server with Ctrl+C.
Test Websites in Safari
After native iPhone control works, test Mobile Safari as a separate web flow. Do not debug Safari web testing until the native screenshot and source checks above already pass.
24. Create a Safari session
For a pure Safari session, many examples use browserName: "Safari". On a physical iPhone, a more explicit and reliable pattern is:
- launch
com.apple.mobilesafari, - request the full context list,
- select the context whose
bundleIdiscom.apple.mobilesafari, - switch into that context before using web commands.
This avoids accidentally attaching to a non-Safari web context such as WebDriverAgent's local health page.
Replace placeholders before running:
<device-name><ios-version><device-udid><team-id><unique-wda-bundle-id>
curl -sS -X POST http://127.0.0.1:4723/session \
  -H 'Content-Type: application/json' \
  -d '{
    "capabilities": {
      "alwaysMatch": {
        "platformName": "iOS",
        "appium:automationName": "XCUITest",
        "appium:deviceName": "<device-name>",
        "appium:platformVersion": "<ios-version>",
        "appium:udid": "<device-udid>",
        "appium:bundleId": "com.apple.mobilesafari",
        "appium:initialDeeplinkUrl": "https://example.com/",
        "appium:xcodeOrgId": "<team-id>",
        "appium:xcodeSigningId": "Apple Development",
        "appium:updatedWDABundleId": "<unique-wda-bundle-id>",
        "appium:includeSafariInWebviews": true,
        "appium:fullContextList": true,
        "appium:additionalWebviewBundleIds": ["com.apple.mobilesafari"],
        "appium:webviewConnectTimeout": 60000,
        "appium:webviewConnectRetries": 60,
        "appium:wdaLaunchTimeout": 120000,
        "appium:newCommandTimeout": 120,
        "appium:safariIgnoreFraudWarning": true
      },
      "firstMatch": [{}]
    }
  }'
Expected output shape:
{
  "value": {
    "sessionId": "<appium-session-id>",
    "capabilities": {
      "bundleId": "com.apple.mobilesafari"
    }
  }
}
Save the session ID:
SID="<appium-session-id>"
BASE="http://127.0.0.1:4723"
export ELEMENT_KEY="element-6066-11e4-a52e-4f735466cecf"
25. Switch to the Safari web context
List contexts:
Expected output shape:
{
  "value": [
    {
      "id": "NATIVE_APP"
    },
    {
      "id": "WEBVIEW_661.1",
      "title": "Example Domain",
      "url": "https://example.com/",
      "bundleId": "com.apple.mobilesafari"
    }
  ]
}
Pick the Mobile Safari web context:
WEBCTX="$(
  curl -sS "$BASE/session/$SID/contexts" |
    python3 -c 'import sys,json; data=json.load(sys.stdin)["value"]; print(next(c["id"] for c in data if c.get("bundleId") == "com.apple.mobilesafari"))'
)"

curl -sS -X POST "$BASE/session/$SID/context" \
  -H 'Content-Type: application/json' \
  -d "{\"name\":\"$WEBCTX\"}"
Expected output:
Verify the current context:
Expected output shape:
26. Verify navigation, title, and source
Navigate to a known page:
curl -sS -X POST "$BASE/session/$SID/url" \
  -H 'Content-Type: application/json' \
  -d '{"url":"https://example.com/?appium-safari-web-test=1"}'
Read the page title:
Expected output:
Check that the web source is readable:
curl -sS "$BASE/session/$SID/source" \
  | python3 -c 'import sys,json; print("Example Domain" in json.load(sys.stdin)["value"])'
Expected output:
Capture a Safari screenshot:
curl -sS "$BASE/session/$SID/screenshot" \
  | python3 -c 'import sys,json,base64; print(json.load(sys.stdin)["value"])' \
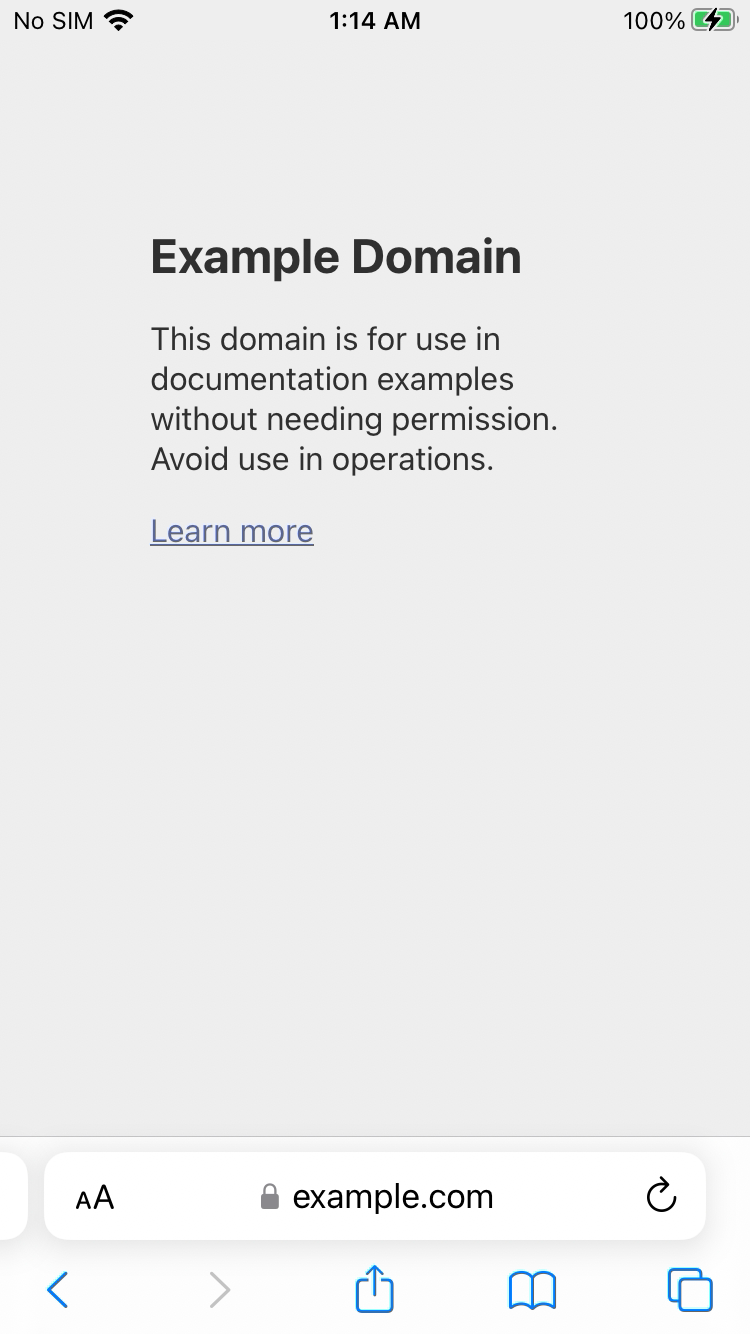
  | base64 --decode > iphone-safari-example.png

file iphone-safari-example.png
Expected output:
Verified Safari screenshot:
27. Verify CSS selectors, typing, and click
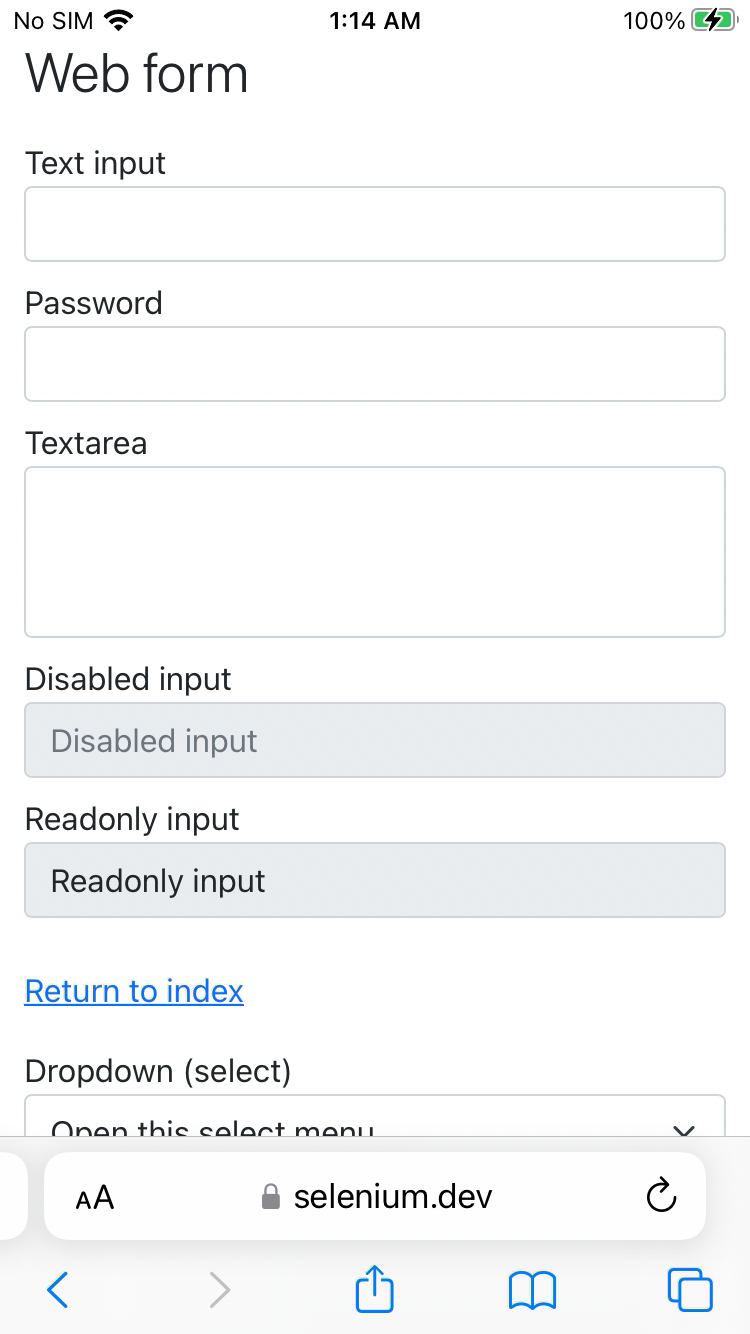
Open Selenium's public test form:
curl -sS -X POST "$BASE/session/$SID/url" \
  -H 'Content-Type: application/json' \
  -d '{"url":"https://www.selenium.dev/selenium/web/web-form.html"}'
Find the text input by CSS selector:
INPUT_ID="$(
  curl -sS -X POST "$BASE/session/$SID/element" \
    -H 'Content-Type: application/json' \
    -d '{"using":"css selector","value":"input[name=\"my-text\"]"}' |
    python3 -c 'import sys,json,os; value=json.load(sys.stdin)["value"]; print(value[os.environ["ELEMENT_KEY"]])'
)"
Type into the field:
curl -sS -X POST "$BASE/session/$SID/element/$INPUT_ID/value" \
  -H 'Content-Type: application/json' \
  -d '{"text":"Appium Safari works","value":["A","p","p","i","u","m"," ","S","a","f","a","r","i"," ","w","o","r","k","s"]}'
Find and click the submit button:
BUTTON_ID="$(
  curl -sS -X POST "$BASE/session/$SID/element" \
    -H 'Content-Type: application/json' \
    -d '{"using":"css selector","value":"button"}' |
    python3 -c 'import sys,json,os; value=json.load(sys.stdin)["value"]; print(value[os.environ["ELEMENT_KEY"]])'
)"

curl -sS -X POST "$BASE/session/$SID/element/$BUTTON_ID/click" \
  -H 'Content-Type: application/json' \
  -d '{}'
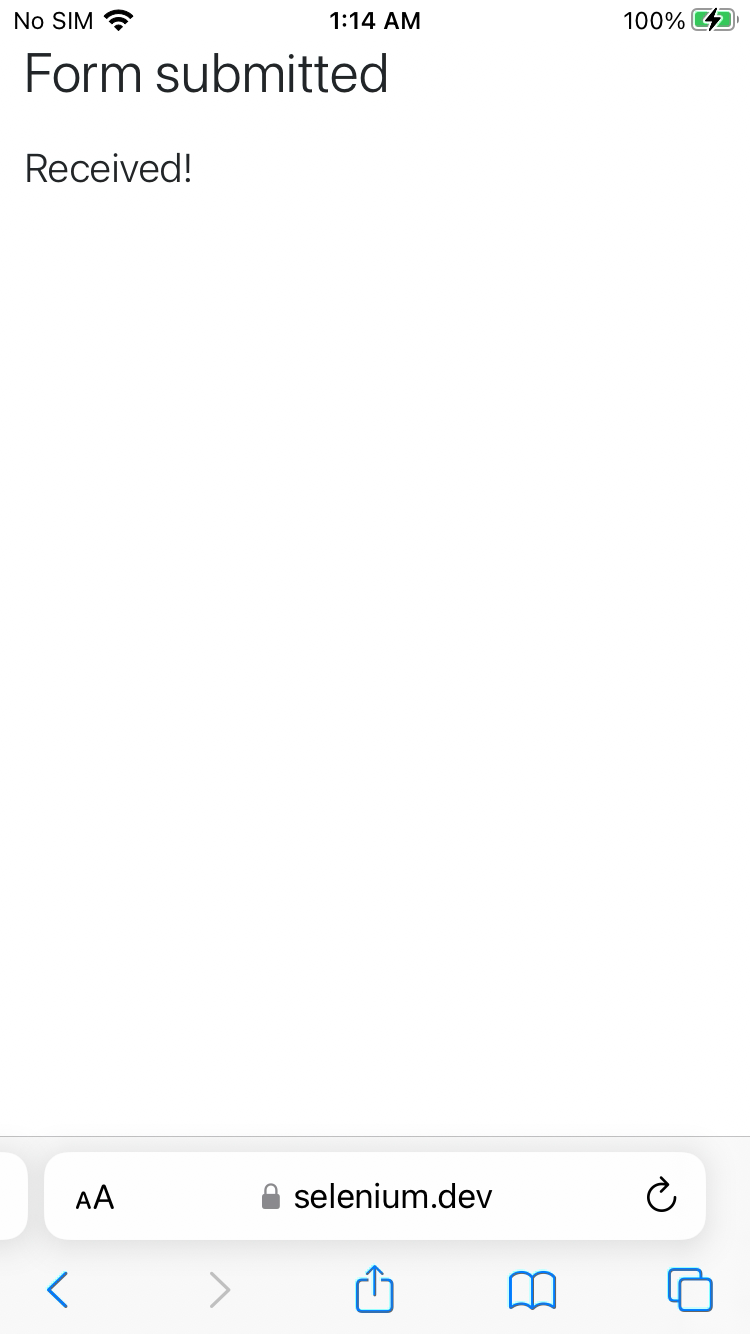
Verify the submitted URL:
Expected output shape:
{
  "value": "https://www.selenium.dev/selenium/web/submitted-form.html?my-text=Appium+Safari+works..."
}
Verified form page and submit result:
End the Safari session:
Reconnect, Restart, and Daily Use
After the first successful setup, do not repeat the full Xcode signing and iPhone trust flow every day. Separate the one-time setup from the repeat workflow.
What persists:
- The iPhone's
Trust This Computerdecision normally survives unplug, replug, Mac restart, and iPhone restart. - The trusted Apple Development profile normally survives unplug, replug, Mac restart, and iPhone restart.
- Safari
Web Inspectornormally stays enabled unless you turn it off or reset Safari/developer settings. - The WebDriverAgent signing setup remains valid as long as the same Apple team, certificate, provisioning profile, and bundle identifier are used.
What does not persist:
- The Appium server process stops when its terminal is closed or the Mac restarts.
- The Appium WebDriver session is temporary. Create a fresh session after reconnecting, restarting, or stopping Appium.
- WebDriverAgent may be relaunched or reinstalled by Appium when needed.
Daily reconnect checklist
Start with the iPhone unlocked and connected over USB.
Confirm Xcode sees the phone:
Expected output shape:
Devices Offline may appear as a section header. The important part is that your iPhone appears above it under available devices.
Confirm USB transport sees the phone:
Expected output shape:
Start Appium:
Expected output shape:
[Appium] Appium REST http interface listener started on http://127.0.0.1:4723
[Appium] Available drivers:
[Appium]   - xcuitest@...
Create a new Appium session using the same capabilities from Create a real-device session. Save the returned session ID:
For Mobile Safari website testing, create the Safari session from Create a Safari session and switch to the Mobile Safari web context again after every fresh session.
Known-good reconnect test
Run this short test after a Mac restart, iPhone restart, unplug/replug, or long idle period.
Check the logical screen size:
Expected output:
The logical size is in XCTest points. A screenshot from the same iPhone may be larger in physical pixels.
Capture a screenshot:
curl -fsS "http://127.0.0.1:4723/session/$SID/screenshot" \
  | python3 -c 'import sys,json,base64; sys.stdout.buffer.write(base64.b64decode(json.load(sys.stdin)["value"]))' \
  > /tmp/appium-iphone-reconnect-test.png

file /tmp/appium-iphone-reconnect-test.png
Expected output shape:
Confirm UI source is readable:
Expected output shape:
If the phone is on the Home screen, you can also verify a real tap by opening Settings. First confirm the Settings icon is visible in the source:
curl -fsS "http://127.0.0.1:4723/session/$SID/source" \
  | python3 -c 'import sys,json; print(json.load(sys.stdin)["value"])' \
  | grep 'name="Settings"'
Expected output shape:
Tap the Settings icon. Coordinates are in logical XCTest points, not physical screenshot pixels. Adjust the coordinates if your icon layout is different.
curl -fsS -X POST "http://127.0.0.1:4723/session/$SID/actions" \
  -H 'Content-Type: application/json' \
  -d '{
    "actions": [{
      "type": "pointer",
      "id": "finger1",
      "parameters": { "pointerType": "touch" },
      "actions": [
        { "type": "pointerMove", "duration": 0, "x": 231, "y": 424, "origin": "viewport" },
        { "type": "pointerDown", "button": 0 },
        { "type": "pause", "duration": 100 },
        { "type": "pointerUp", "button": 0 }
      ]
    }]
  }'
Expected output:
Confirm Settings opened:
curl -fsS "http://127.0.0.1:4723/session/$SID/source" \
  | python3 -c 'import sys,json; print(json.load(sys.stdin)["value"])' \
  | grep 'bundleId="com.apple.Preferences"'
Expected output shape:
When to repeat iPhone trust
Do not repeat the iPhone trust steps for normal unplug/replug. Repeat the trust flow only when something material changes:
- WebDriverAgent is signed with a different Apple team or certificate.
appium:updatedWDABundleIdchanges.- Xcode recreates signing with a different provisioning profile.
- The iPhone is erased, reset, or its developer trust settings are reset.
- Developer Mode is disabled and re-enabled.
- WebDriverAgent is deleted and reinstalled with different signing.
Fast recovery after reconnect
If the device is not found:
- Unlock the iPhone.
- Wait 10-20 seconds.
- Rerun
xcrun xctrace list devices. - Rerun
pymobiledevice3 usbmux list. - Unplug and replug the USB cable.
If Appium cannot create a session:
- Delete any old session if you still have its ID.
- Stop Appium with
Ctrl+C. - Confirm the phone is unlocked.
- Start Appium again.
- Create a fresh session.
Rebuild or re-sign WebDriverAgent only after the reconnect checks pass but session creation fails with a clear signing, provisioning, or WebDriverAgent launch error.
Reliability Test
Before building a wrapper, MCP bridge, or WDIO layer, prove raw Appium works.
Run 10 cycles manually or from a small script:
- Take screenshot.
- Get UI source.
- Tap a harmless coordinate.
- Swipe or scroll.
- Press Home.
- Open Settings.
Pass condition:
- 10 consecutive cycles complete without WDA crash.
- The USB device does not disconnect.
- Appium does not lose the session.
- Screenshots and source are returned in every cycle.
On this Mac and iPhone, the raw Appium stack completed 10 consecutive cycles successfully on 2026-06-25.
Final Success Checklist
The setup is complete only when every item below is true:
- Xcode lists the physical iPhone under connected devices.
xcrun xctrace list devicesshows the iPhone UDID.pymobiledevice3 usbmux listshowsConnectionType: USB.- The iPhone has trusted the Mac.
- Developer Mode is enabled on the iPhone.
Enable UI Automationis enabled on the iPhone.- Safari
Web Inspectoris enabled if Mobile Safari website testing is required. - WebDriverAgentRunner has no red signing error in Xcode.
- Appium starts on
http://127.0.0.1:4723. - A real-device Appium session is created successfully.
- Screenshot capture returns a PNG.
- The live MJPEG stream is reachable on the configured local port, usually
http://127.0.0.1:9100/. - UI source returns XCTest XML.
- A harmless tap or app launch changes the phone state.
- For Safari testing,
/contextsreturns aWEBVIEW_...context whosebundleIdiscom.apple.mobilesafari. - For Safari testing, title/source, CSS selector lookup, typing, and click work in that web context.
- The Appium session can be deleted cleanly.
- A reconnect test passes after unplug/replug or restart.
If any item fails, use the troubleshooting table below from the first failed checkpoint. Do not rebuild the whole stack until the specific failing layer is identified.
Troubleshooting
| Symptom | Check | Fix |
|---|---|---|
xcrun xctrace list devices does not show the iPhone |
USB cable, trust state, unlocked phone | Reconnect USB, unlock iPhone, accept Trust This Computer. |
| Appium session fails with signing error | Xcode account, certificate, team ID, WDA bundle ID | Add Apple account in Xcode, create Apple Development certificate, use a unique appium:updatedWDABundleId. |
| iPhone says developer app is not trusted | iPhone developer profile | Open Settings -> General -> VPN & Device Management and trust the developer app. |
| WDA launch times out | Phone locked or Developer Mode off | Unlock phone, confirm Developer Mode is on, retry session creation. |
appium driver list --installed does not show xcuitest |
Driver installation | Run appium driver install xcuitest. |
| Appium hangs during a command | WDA or XCTest is stuck | Delete the session, stop Appium, unlock phone, restart Appium. |
http://127.0.0.1:9100/ does not show the live screen stream |
MJPEG port conflict, WDA not running, or the stream was not forwarded | Confirm the Appium session is active, check curl -I http://127.0.0.1:9100/, and set a unique appium:mjpegServerPort such as 9110 if 9100 is already busy. |
| Device disappears during test | USB instability | Use a known-good cable and avoid USB hubs during first setup. |
| Xcode asks for iOS platform support | Missing Xcode device support | Let Xcode install required platform/device support components. |
Safari session fails with The remote debugger did not return any connected web applications |
Safari Web Inspector is off, Safari has no debuggable page, or the web context is not ready | Turn on Settings -> Safari -> Advanced -> Web Inspector, open Safari, and use webviewConnectTimeout only after Web Inspector is enabled. |
Safari web commands read http://127.0.0.1:8100/health instead of the website |
Appium attached to WebDriverAgent's local web endpoint instead of Mobile Safari | Use appium:fullContextList, select the context whose bundleId is com.apple.mobilesafari, then switch to that context before web commands. |
Security Notes
- Do not publish UDIDs, serial numbers, Apple IDs, team IDs, or signing keys.
- Do not share Apple account passwords, OTPs, private keys,
.p12files, or recovery codes. - Use a unique WDA bundle ID per developer or machine.
- Keep screenshots redacted before publishing, especially Settings root screens, Xcode signing screens, browser history, and address bars.
- Prefer raw Appium first. Add WDIO, MCP, or other wrappers only after Appium itself is stable.
References
- Appium Install Appium: Appium installation and server startup.
- Appium XCUITest Device Preparation: real-device requirements such as trusted device, Developer Mode, UI Automation, and provisioning.
- Appium XCUITest Capabilities:
xcodeOrgId,xcodeSigningId,updatedWDABundleId, WDA timeout capabilities, and Safari web-context capabilities. - Appium XCUITest MJPEG Guide: WDA MJPEG stream behavior, default port
9100, port forwarding, and parallel-session port guidance. - Homebrew Installation: Homebrew install command and shell setup.
- Apple Xcode: Xcode toolchain overview.
Maintenance Notes
- Update command outputs when Appium, Xcode, or iOS versions change.
- Keep all screenshots in
docs/assets/ios-real-device-appium-control/. - Keep raw screenshots out of the repository because they often contain Apple IDs, UDIDs, serial numbers, or installed app names.
- Re-run
mkdocs build --strictafter each edit.